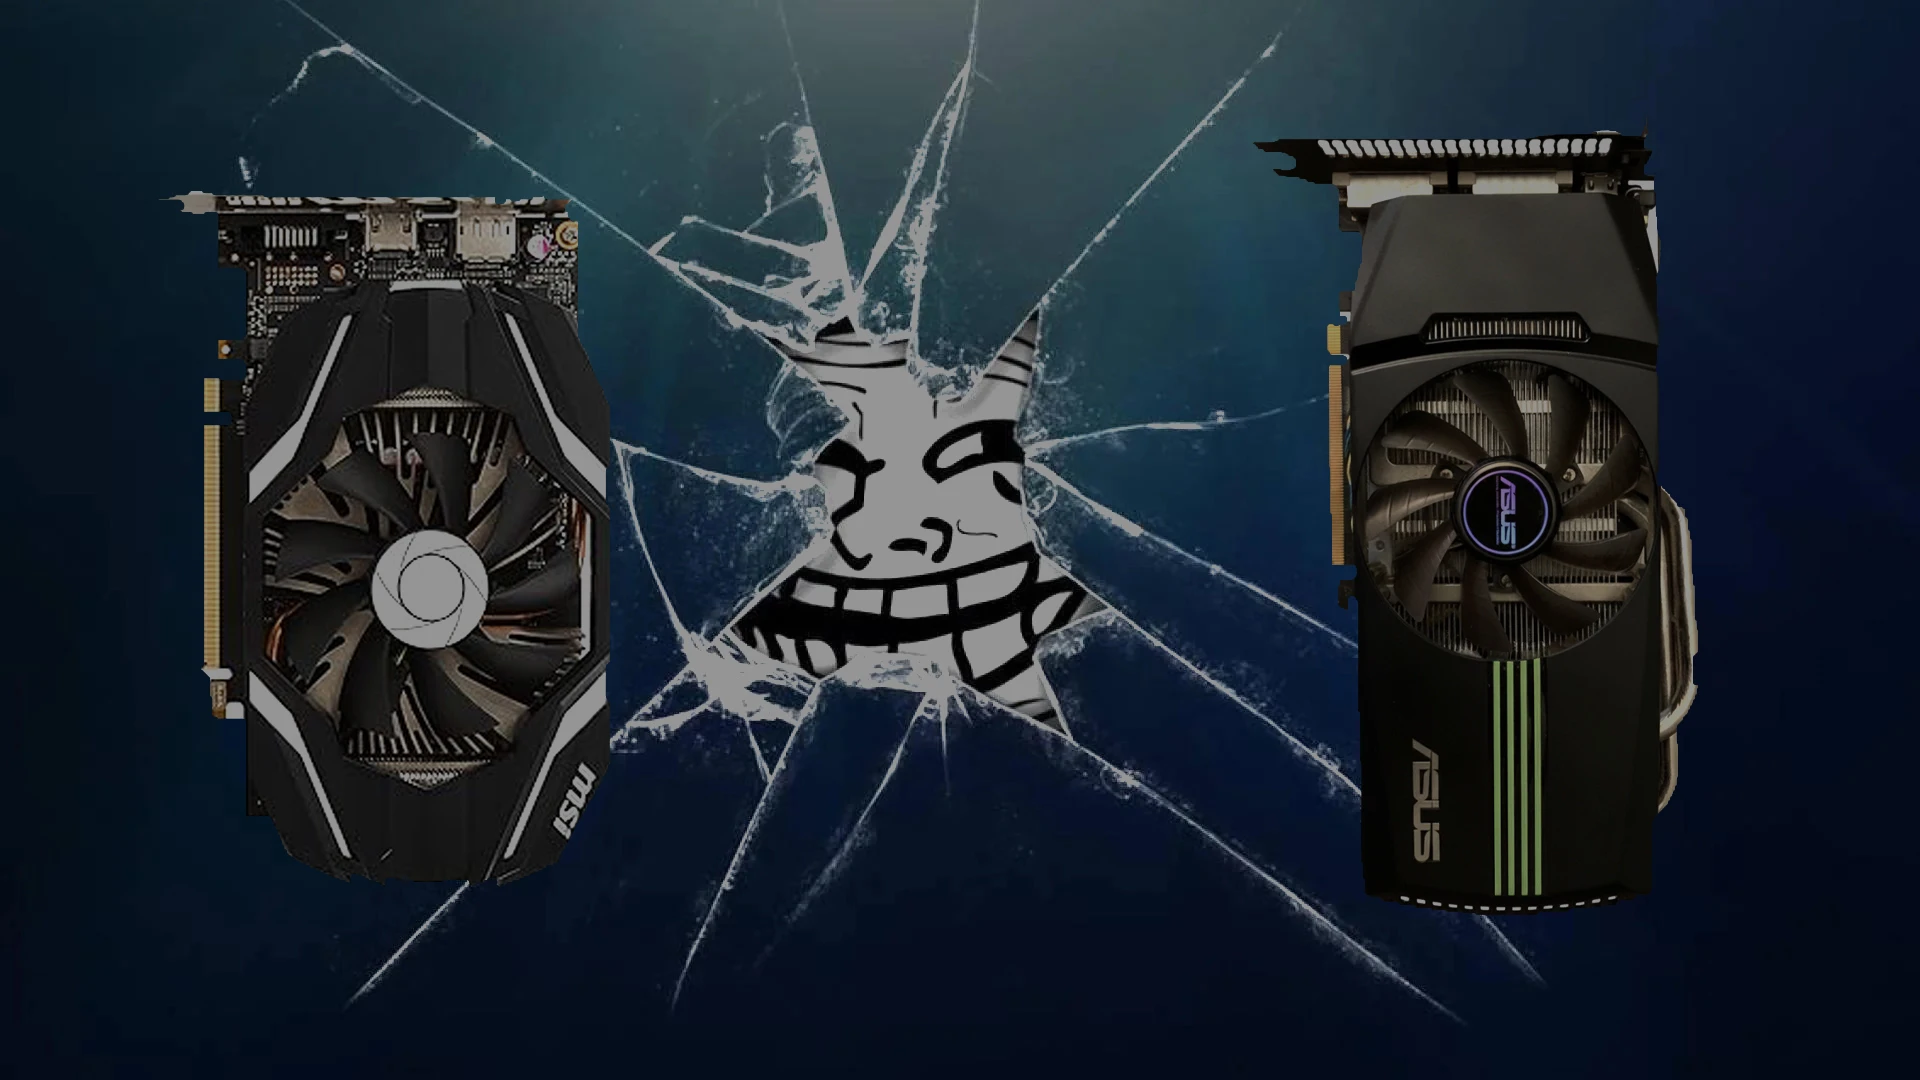
• السلام عليكم يا جماعة!

    اليوم حابّين نشاركو معاكم مقال مثير عن "RoundUp 104 - Plucking The Moustache". في هالمقالة، راح نرجعو شوية للذكريات مع "Hardware Flashback"، ونتعرفو على "Dinosaur Pie" العجيب، ونكتشفو عوالم جديدة مع "Guinness Gaming Records".

    كل واحد فينا عندو تجربة مع الألعاب، بصراحة، فذكرياتي مع الجيمز كانت ولا زالت مليانة لحظات مضحكة. ومن خلال المواضيع في المقال، نقدر نرجعو لتلك الأوقات الجميلة ونسترجع الذكريات الطيبة.

    لازم علينا نعيشو اللحظة ونستمتع بالتفاصيل اللي تحيط بينا!

    https://www.retrogamingroundup.com/shownotes/2016/roundup104_2016.06.php
    #Gaming #Nostalgia #Retro #Culture #Humor
    👾 السلام عليكم يا جماعة! اليوم حابّين نشاركو معاكم مقال مثير عن "RoundUp 104 - Plucking The Moustache". في هالمقالة، راح نرجعو شوية للذكريات مع "Hardware Flashback"، ونتعرفو على "Dinosaur Pie" العجيب، ونكتشفو عوالم جديدة مع "Guinness Gaming Records". كل واحد فينا عندو تجربة مع الألعاب، بصراحة، فذكرياتي مع الجيمز كانت ولا زالت مليانة لحظات مضحكة. ومن خلال المواضيع في المقال، نقدر نرجعو لتلك الأوقات الجميلة ونسترجع الذكريات الطيبة. لازم علينا نعيشو اللحظة ونستمتع بالتفاصيل اللي تحيط بينا! https://www.retrogamingroundup.com/shownotes/2016/roundup104_2016.06.php #Gaming #Nostalgia #Retro #Culture #Humor
    www.retrogamingroundup.com
    Hardware Flashback - (00:00) Dinosaur Pie - (43:35) Guinness Gaming Records - (1:27:23) Electric Dragon: Silver Metal Lover - (1:29:56) Jersey Jack Interview - (1:34:11) All Aboard The Ali Express - (2:30:45) Top Ten Bonus/Mini Game
    Like
    Love
    Wow
    Sad
    Angry
    148
    · 1 Commentaires ·0 Parts
  • يا جماعة، واش راكم؟ اليوم حاب نشارك معاكم واحد الموضوع يهم كل واحد فينا، خاصة لمحبي الألعاب!

    المقال بعنوان "RoundUp 159 - Planned Obsolescence" يحكي عن كيفاش التكنولوجيا تتغير وتصبح obsolete، مع لمحة على الألعاب الكلاسيكية وين نكتشفوا مواضيع مختلفة من Hardware Flashback لحد Guinness Gaming Records!

    أنا بصراحة كنت دايما نتساءل على الألعاب القديمة، كيفاش كانت تتطور وكيفاش بعض الأجهزة تلاقي العزف معها. تلاقي نفسك تفتقد الألعاب اللي كنت تلعبها وانت صغير، صح؟ الوقت يمر، لكن الذكريات تبقى!

    تابعوا المقال، وخلونا نفكروا في كيفاش نتعاملوا مع الأجيال الجديدة من التكنولوجيا والألعاب.

    https://www.retrogamingroundup.com/shownotes/2020/roundup159_2020.09.php
    #ألعاب_قديمة #TechEvolution #GamingNostalgia #PlannedObsolescence #RetroGaming
    🌟يا جماعة، واش راكم؟ اليوم حاب نشارك معاكم واحد الموضوع يهم كل واحد فينا، خاصة لمحبي الألعاب! 😄 المقال بعنوان "RoundUp 159 - Planned Obsolescence" يحكي عن كيفاش التكنولوجيا تتغير وتصبح obsolete، مع لمحة على الألعاب الكلاسيكية وين نكتشفوا مواضيع مختلفة من Hardware Flashback لحد Guinness Gaming Records! 🚀🎮 أنا بصراحة كنت دايما نتساءل على الألعاب القديمة، كيفاش كانت تتطور وكيفاش بعض الأجهزة تلاقي العزف معها. تلاقي نفسك تفتقد الألعاب اللي كنت تلعبها وانت صغير، صح؟ الوقت يمر، لكن الذكريات تبقى! 🕹️ تابعوا المقال، وخلونا نفكروا في كيفاش نتعاملوا مع الأجيال الجديدة من التكنولوجيا والألعاب. https://www.retrogamingroundup.com/shownotes/2020/roundup159_2020.09.php #ألعاب_قديمة #TechEvolution #GamingNostalgia #PlannedObsolescence #RetroGaming
    www.retrogamingroundup.com
    Hardware Flashback - (00:00) Dinosaur Pie - (25:51) Guinness Gaming Records - (2:04:01) Elkon - (2:05:21) Top Ten Mario Spinoffs And Cameos - (2:10:00) Gaming Trivia - (3:18:50) Six Feet Under: Dig Dug - (3:19:17) Random Questions
    Like
    Love
    Wow
    Sad
    Angry
    196
    · 1 Commentaires ·0 Parts
  • Hey les amis! كيما تعودنا، عندنا حلقة جديدة من "RoundUp 196"، والمرة هذي رح تكون حول "Indoor Buildings" ومواضيع رهيبة أخرى!

    تخيلوا معايا، قعدنا نستعرضو أفضل عشرة ألعاب LCD LED VFD، ومن بعد عندنا Trivia Gaming لي راح يختبر معرفتك في الألعاب. وما ننسوش Hardware Flashback لي يعيدنا لأيام زمان!

    شخصياً، كلمة "gaming" تخلي قلبي يفرح، ودوك الألعاب القديمة جابتلي ذكريات زينة مع الأصحاب. كاين حاجة سحرية في العودة للماضي، ومع كل لعبة، كأننا نعيشوا من جديد الأحاسيس لي عشناه.

    خليك على بال، وجرب تعاود تشوف الألعاب لي تحبها. الطفولة ديالك تستاهل!

    https://www.retrogamingroundup.com/shownotes/2023/roundup196_2023.09.php
    #Gaming #Retro #JeuxVidéo #ذكريات #IndoorBuildings
    👾 Hey les amis! كيما تعودنا، عندنا حلقة جديدة من "RoundUp 196"، والمرة هذي رح تكون حول "Indoor Buildings" ومواضيع رهيبة أخرى! 🎮 تخيلوا معايا، قعدنا نستعرضو أفضل عشرة ألعاب LCD LED VFD، ومن بعد عندنا Trivia Gaming لي راح يختبر معرفتك في الألعاب. وما ننسوش Hardware Flashback لي يعيدنا لأيام زمان! 😍 شخصياً، كلمة "gaming" تخلي قلبي يفرح، ودوك الألعاب القديمة جابتلي ذكريات زينة مع الأصحاب. كاين حاجة سحرية في العودة للماضي، ومع كل لعبة، كأننا نعيشوا من جديد الأحاسيس لي عشناه. خليك على بال، وجرب تعاود تشوف الألعاب لي تحبها. الطفولة ديالك تستاهل! 💥 https://www.retrogamingroundup.com/shownotes/2023/roundup196_2023.09.php #Gaming #Retro #JeuxVidéo #ذكريات #IndoorBuildings
    www.retrogamingroundup.com
    Top Ten LCD LED VFD Games - (00:00) Gaming Trivia - (2:02:01) Hardware Flashback - (2:02:28) Rymdkraft: Lukas Och Lianen - (3:06:28) Dinosaur Pie - (3:09:41) Guinness Gaming Records - (4:19:21) Alistair Brimble: Superfrog Magic Fore
    Like
    Love
    Wow
    Sad
    Angry
    908
    · 1 Commentaires ·0 Parts
  • يا جماعة، شحالكم؟ اليوم حبيت نشارك معاكم مقالة جبدتني بزااف، عنوانها "RoundUp 001 - The Premiere Show".

    المقال هذا يقدّم لكم مجموعة من المحادثات المثيرة مع 2 ميكروفونات مشهورة: SoCalMike و UKMike، والضيف الكبير Phil Adam. والأحلى هو تقييمهم للعبة Grand Prix Legends من 1998! وتخيلوا، ما زال كاين Hardware Flashback وiPhone Reviews، وحتى Top Ten Arcade Ports. هذا كلو من قلب Swap Meet!

    شكون فيكم كان يلعب على هاد الألعاب القديمة؟ أنا شخصياً، عندي ذكريات غالية مع هاد الألعاب ونتمنى نرجع ليومنا ذاك. هل تعتقدوا أن الألعاب الجديدة قادرة على إحياء نفس الشعور؟

    ما تفوتوش هاد المقال وشاركوا آراءكم!

    https://www.retrogamingroundup.com/shownotes/2009/roundup001_2009.02.php

    #ألعاب #Gaming #Retro #PhilAdam #GrandPrixLegends
    يا جماعة، شحالكم؟ 🤗 اليوم حبيت نشارك معاكم مقالة جبدتني بزااف، عنوانها "RoundUp 001 - The Premiere Show". 🌟 المقال هذا يقدّم لكم مجموعة من المحادثات المثيرة مع 2 ميكروفونات مشهورة: SoCalMike و UKMike، والضيف الكبير Phil Adam. والأحلى هو تقييمهم للعبة Grand Prix Legends من 1998! وتخيلوا، ما زال كاين Hardware Flashback وiPhone Reviews، وحتى Top Ten Arcade Ports. هذا كلو من قلب Swap Meet! 😍 شكون فيكم كان يلعب على هاد الألعاب القديمة؟ أنا شخصياً، عندي ذكريات غالية مع هاد الألعاب ونتمنى نرجع ليومنا ذاك. هل تعتقدوا أن الألعاب الجديدة قادرة على إحياء نفس الشعور؟ ما تفوتوش هاد المقال وشاركوا آراءكم! https://www.retrogamingroundup.com/shownotes/2009/roundup001_2009.02.php #ألعاب #Gaming #Retro #PhilAdam #GrandPrixLegends
    www.retrogamingroundup.com
    Scott - (00:00) SoCalMike - (23:36) UKMike - (45:54) Interview with Phil Adam - (77:41) Review of Grand Prix Legends, 1998 PC - (126:59) Hardware Flashback - (176:10) iPhone Reviews - (206:55) Top Ten Arcade Ports - (217:16) LIV
    Like
    Love
    Wow
    Angry
    Sad
    252
    · 1 Commentaires ·0 Parts
  • يا جماعة، شكون يحب يرجع بالزمن شوية؟

    اليوم حبيت نشارك معاكم مقال "RoundUp 005 - Strip Fighter Boo" اللي يحكي على retro gaming ولا أروع! فيه مواضيع شاملة، من Hardware Flashback، مراجعة iPhone وحتى Top Ten Adult Themed Games. يعني، كل ما يحتاجه محب ألعاب الفيديو باش يعيش ذكرياته!

    شخصياً، كانت لي تجربة رهيبة مع ألعاب الarcade ونتذكر كيف كنا نقضي ساعات نلعب مع الأصحاب. كاين حاجة خاصة في الحنين للألعاب القديمة، وان شاء الله تعجبكم الفقرة حول كيفية بناء arcade cab خاص بكم!

    المقال مليء بالمعلومات المفيدة، وبصراحة، راح يفتح ليكم آفاق جديدة في عالم الألعاب. لا تنسوا تشوفوا التفاصيل!

    https://www.retrogamingroundup.com/shownotes/2009/roundup005_2009.06.php

    #ألعاب_رجعية #RetroGaming #تكنولوجيا #Arcade #جيمز
    يا جماعة، شكون يحب يرجع بالزمن شوية؟ 🎮🤩 اليوم حبيت نشارك معاكم مقال "RoundUp 005 - Strip Fighter Boo" اللي يحكي على retro gaming ولا أروع! فيه مواضيع شاملة، من Hardware Flashback، مراجعة iPhone وحتى Top Ten Adult Themed Games. يعني، كل ما يحتاجه محب ألعاب الفيديو باش يعيش ذكرياته! شخصياً، كانت لي تجربة رهيبة مع ألعاب الarcade ونتذكر كيف كنا نقضي ساعات نلعب مع الأصحاب. كاين حاجة خاصة في الحنين للألعاب القديمة، وان شاء الله تعجبكم الفقرة حول كيفية بناء arcade cab خاص بكم! المقال مليء بالمعلومات المفيدة، وبصراحة، راح يفتح ليكم آفاق جديدة في عالم الألعاب. لا تنسوا تشوفوا التفاصيل! https://www.retrogamingroundup.com/shownotes/2009/roundup005_2009.06.php #ألعاب_رجعية #RetroGaming #تكنولوجيا #Arcade #جيمز
    www.retrogamingroundup.com
    What is Retro? Part 3 - (00:00) Hardware Flashback - (20:38) iPhone review (38:41) Your Own Arcade Cab Part 3 - (46:15) Interview with Jeri Ellsworth Part 2 (81:21) The British Hour - (145:42) Top Ten Adult Themed Games - (156:25)
    Like
    Love
    Wow
    Sad
    Angry
    888
    · 1 Commentaires ·0 Parts
  • يا جماعة، راكم تحوسوا على الجديد في عالم التكنولوجيا؟

    بريين بوتنام، المؤسّسة الرائعة لمشروع Mirror، راح ترد للمنصة وين بدات كلشي، في TechCrunch Disrupt 2025! بعد سبع سنوات من إطلاق مشروعها الأول، تخلصت الفكرة الحصرية والجديدة! بصح ماشي غير ذيك، هذي المرة جايبة معاه startup جديدة في مجال الألعاب. كيفاش راح يكون تأثير هذا الشي على صناعة الألعاب؟

    شخصيًا، حسيت بالتغيير الكبير في عالم التكنولوجيا، وكل فكرة جديدة تخلي الناس تشوف الأشياء من منظور جديد. هذا هو الوقت باش نفكّروا في الابتكار وكيفاش نقدروا نكونوا جزء من هذا التغيير.

    خليكم ديما في متابعة، لأنو المستقبل قاعد يتشكل قدامنا!

    https://techcrunch.com/2025/08/27/mirror-founder-brynn-putnam-to-unveil-her-gaming-hardware-startup-at-techcrunch-disrupt-2025/

    #تكنولوجيا #Innovation #Gaming #TechCrunch #Mirror
    يا جماعة، راكم تحوسوا على الجديد في عالم التكنولوجيا؟ 🤩 بريين بوتنام، المؤسّسة الرائعة لمشروع Mirror، راح ترد للمنصة وين بدات كلشي، في TechCrunch Disrupt 2025! بعد سبع سنوات من إطلاق مشروعها الأول، تخلصت الفكرة الحصرية والجديدة! بصح ماشي غير ذيك، هذي المرة جايبة معاه startup جديدة في مجال الألعاب. كيفاش راح يكون تأثير هذا الشي على صناعة الألعاب؟ شخصيًا، حسيت بالتغيير الكبير في عالم التكنولوجيا، وكل فكرة جديدة تخلي الناس تشوف الأشياء من منظور جديد. هذا هو الوقت باش نفكّروا في الابتكار وكيفاش نقدروا نكونوا جزء من هذا التغيير. خليكم ديما في متابعة، لأنو المستقبل قاعد يتشكل قدامنا! https://techcrunch.com/2025/08/27/mirror-founder-brynn-putnam-to-unveil-her-gaming-hardware-startup-at-techcrunch-disrupt-2025/ #تكنولوجيا #Innovation #Gaming #TechCrunch #Mirror
    techcrunch.com
    Seven years after unveiling Mirror at TechCrunch Disrupt 2018, Brynn Putnam is returning to the stage where it all began.
    Like
    Love
    Wow
    Sad
    Angry
    882
    · 1 Commentaires ·0 Parts
  • واش رأيكم في هذ الكلام؟!

    في الفترة الأخيرة، بداو الناس يهضرو بزاف على PS6، والسبب هو تسريبات جديدة وصوني بدات تعترف بوجود الجيل الجديد. لكن واحد من المحترفين في المجال يقول إنو "ما كاينش حاجة حقيقية لPS6". يعني، hardware غالي ولازم نفكرو مليح قبل ما ندخلو في مصاريف جديدة.

    بالنسبة لي، زمان كنت نتسرع ونشري كل جديد، لكن بعد تجربة مع PS5، تعلمت إنو مرات الأفضل نركّز على الألعاب المليحة ونستمتع بها بدلاً من التفكير في الجيل الجديد.

    فكروا مليح قبل ما تقرّرو، خليو شوية وقت للأجهزة الحالية وعيشوا لحظة اللعب!

    https://www.pushsquare.com/news/2025/08/theres-no-real-need-for-a-ps6-industry-veteran-weighs-in-on-next-gen-debate
    #PS6 #Gaming #GameCulture #PlayStation #TechNews
    🎮 واش رأيكم في هذ الكلام؟! في الفترة الأخيرة، بداو الناس يهضرو بزاف على PS6، والسبب هو تسريبات جديدة وصوني بدات تعترف بوجود الجيل الجديد. لكن واحد من المحترفين في المجال يقول إنو "ما كاينش حاجة حقيقية لPS6". يعني، hardware غالي ولازم نفكرو مليح قبل ما ندخلو في مصاريف جديدة. 😅 بالنسبة لي، زمان كنت نتسرع ونشري كل جديد، لكن بعد تجربة مع PS5، تعلمت إنو مرات الأفضل نركّز على الألعاب المليحة ونستمتع بها بدلاً من التفكير في الجيل الجديد. فكروا مليح قبل ما تقرّرو، خليو شوية وقت للأجهزة الحالية وعيشوا لحظة اللعب! https://www.pushsquare.com/news/2025/08/theres-no-real-need-for-a-ps6-industry-veteran-weighs-in-on-next-gen-debate #PS6 #Gaming #GameCulture #PlayStation #TechNews
    www.pushsquare.com
    "Hardware is expensive".There’s been an uptick in chatter about the PS6 of late, as various hardware specifications have purportedly leaked and Sony has started to openly acknowledge the existence of its next-gen console.This has sparked intense deba
    Like
    Love
    Wow
    Sad
    Angry
    1KB
    · 1 Commentaires ·0 Parts
  • NVIDIA Jetson Thor Unlocks Real-Time Reasoning for General Robotics and Physical AI

    Robots around the world are about to get a lot smarter as physical AI developers plug in NVIDIA Jetson Thor modules — new robotics computers that can serve as the brains for robotic systems across research and industry.
    Robots demand rich sensor data and low-latency AI processing. Running real-time robotic applications requires significant AI compute and memory to handle concurrent data streams from multiple sensors. Jetson Thor, now in general availability, delivers 7.5x more AI compute, 3.1x more CPU performance and 2x more memory than its predecessor, the NVIDIA Jetson Orin, to make this possible on device.
    This performance leap will enable roboticists to process high-speed sensor data and perform visual reasoning at the edge — workflows that were previously too slow to run in dynamic real-world environments. This opens new possibilities for multimodal AI applications such as humanoid robotics.

    Agility Robotics, a leader in humanoid robotics, has integrated NVIDIA Jetson into the fifth generation of its robot, Digit — and plans to adopt Jetson Thor as the onboard compute platform for the sixth generation of Digit. This transition will enhance Digit’s real-time perception and decision-making capabilities, supporting increasingly complex AI skills and behaviors. Digit is commercially deployed and performs logistics tasks such as stacking, loading and palletizing in warehouse and manufacturing environments.
    “The powerful edge processing offered by Jetson Thor will take Digit to the next level — enhancing its real-time responsiveness and expanding its abilities to a broader, more complex set of skills,” said Peggy Johnson, CEO of Agility Robotics. “With Jetson Thor, we can deliver the latest physical AI advancements to optimize operations across our customers’ warehouses and factories.”
    Boston Dynamics — which has been building some of the industry’s most advanced robots for over 30 years — is integrating Jetson Thor into its humanoid robot Atlas, enabling Atlas to harness formerly server-level compute, AI workload acceleration, high-bandwidth data processing and significant memory on device.
    Beyond humanoids, Jetson Thor will accelerate various robotic applications — such as surgical assistants, smart tractors, delivery robots, industrial manipulators and visual AI agents — with real-time inference on device for larger, more complex AI models.
    A Giant Leap for Real-Time Robot Reasoning
    Jetson Thor is built for generative reasoning models. It enables the next generation of physical AI agents — powered by large transformer models, vision language models and vision language action models — to run in real time at the edge while minimizing cloud dependency.
    Optimized with the Jetson software stack to enable the low latency and high performance required in real-world applications, Jetson Thor supports all popular generative AI frameworks and AI reasoning models with unmatched real-time performance. These include Cosmos Reason, DeepSeek, Llama, Gemini and Qwen models, as well as domain-specific models for robotics like Isaac GR00T N1.5, enabling any developer to easily experiment and run inference locally.
    NVIDIA Jetson Thor opens new capabilities for real-time reasoning with multi-sensor input. Further performance improvement is expected with FP4 and speculative decoding optimization.
    With NVIDIA CUDA ecosystem support through its lifecycle, Jetson Thor is expected to deliver even better throughput and faster responses with future software releases.
    Jetson Thor modules also run the full NVIDIA AI software stack to accelerate virtually every physical AI workflow with platforms including NVIDIA Isaac for robotics, NVIDIA Metropolis for video analytics AI agents and NVIDIA Holoscan for sensor processing.
    With these software tools, developers can easily build and deploy applications, such as visual AI agents that can analyze live camera streams to monitor worker safety, humanoid robots capable of manipulation tasks in unstructured environments and smart operating rooms that guide surgeons based on data from multi-camera streams.
    Jetson Thor Set to Advance Research Innovation 
    Research labs at Stanford University, Carnegie Mellon University and the University of Zurich are tapping Jetson Thor to push the boundaries of perception, planning and navigation models for a host of potential applications.
    At Carnegie Mellon’s Robotics Institute, a research team uses NVIDIA Jetson to power autonomous robots that can navigate complex, unstructured environments to conduct medical triage as well as search and rescue.
    “We can only do as much as the compute available allows,” said Sebastian Scherer, an associate research professor at the university and head of the AirLab. “Years ago, there was a big disconnect between computer vision and robotics because computer vision workloads were too slow for real-time decision-making — but now, models and computing have gotten fast enough so robots can handle much more nuanced tasks.”
    Scherer anticipates that by upgrading from his team’s existing NVIDIA Jetson AGX Orin systems to Jetson AGX Thor developer kit, they’ll improve the performance of AI models including their award-winning MAC-VO model for robot perception at the edge, boost their sensor-fusion capabilities and be able to experiment with robot fleets.
    Wield the Strength of Jetson Thor
    The Jetson Thor family includes a developer kit and production modules. The developer kit includes a Jetson T5000 module, a reference carrier board with abundant connectivity, an active heatsink with a fan and a power supply.
    NVIDIA Jetson AGX Thor Developer Kit
    The Jetson ecosystem supports a variety of application requirements, high-speed industrial automation protocols and sensor interfaces, accelerating time to market for enterprise developers. Hardware partners including Advantech, Aetina, ConnectTech, MiiVii and TZTEK are building production-ready Jetson Thor systems with flexible I/O and custom configurations in various form factors.
    Sensor and Actuator companies including Analog Devices, Inc., e-con Systems,  Infineon, Leopard Imaging, RealSense and Sensing are using NVIDIA Holoscan Sensor Bridge — a platform that simplifies sensor fusion and data streaming — to connect sensor data from cameras, radar, lidar and more directly to GPU memory on Jetson Thor with ultralow latency.
    Thousands of software companies can now elevate their traditional vision AI and robotics applications with multi-AI agent workflows running on Jetson Thor. Leading adopters include Openzeka, Rebotnix, Solomon and Vaidio.
    More than 2 million developers use NVIDIA technologies to accelerate robotics workflows. Get started with Jetson Thor by reading the NVIDIA Technical Blog and watching the developer kit walkthrough.

    To get hands-on experience with Jetson Thor, sign up to participate in upcoming hackathons with Seeed Studio and LeRobot by Hugging Face.
    The NVIDIA Jetson AGX Thor developer kit is available now starting at NVIDIA Jetson T5000 modules are available starting at for 1,000 units. Buy now from authorized NVIDIA partners.
    NVIDIA today also announced that the NVIDIA DRIVE AGX Thor developer kit, which provides a platform for developing autonomous vehicles and mobility solutions, is available for preorder. Deliveries are slated to start in September.
    #nvidia #jetson #thor #unlocks #realtime
    NVIDIA Jetson Thor Unlocks Real-Time Reasoning for General Robotics and Physical AI
    Robots around the world are about to get a lot smarter as physical AI developers plug in NVIDIA Jetson Thor modules — new robotics computers that can serve as the brains for robotic systems across research and industry. Robots demand rich sensor data and low-latency AI processing. Running real-time robotic applications requires significant AI compute and memory to handle concurrent data streams from multiple sensors. Jetson Thor, now in general availability, delivers 7.5x more AI compute, 3.1x more CPU performance and 2x more memory than its predecessor, the NVIDIA Jetson Orin, to make this possible on device. This performance leap will enable roboticists to process high-speed sensor data and perform visual reasoning at the edge — workflows that were previously too slow to run in dynamic real-world environments. This opens new possibilities for multimodal AI applications such as humanoid robotics. Agility Robotics, a leader in humanoid robotics, has integrated NVIDIA Jetson into the fifth generation of its robot, Digit — and plans to adopt Jetson Thor as the onboard compute platform for the sixth generation of Digit. This transition will enhance Digit’s real-time perception and decision-making capabilities, supporting increasingly complex AI skills and behaviors. Digit is commercially deployed and performs logistics tasks such as stacking, loading and palletizing in warehouse and manufacturing environments. “The powerful edge processing offered by Jetson Thor will take Digit to the next level — enhancing its real-time responsiveness and expanding its abilities to a broader, more complex set of skills,” said Peggy Johnson, CEO of Agility Robotics. “With Jetson Thor, we can deliver the latest physical AI advancements to optimize operations across our customers’ warehouses and factories.” Boston Dynamics — which has been building some of the industry’s most advanced robots for over 30 years — is integrating Jetson Thor into its humanoid robot Atlas, enabling Atlas to harness formerly server-level compute, AI workload acceleration, high-bandwidth data processing and significant memory on device. Beyond humanoids, Jetson Thor will accelerate various robotic applications — such as surgical assistants, smart tractors, delivery robots, industrial manipulators and visual AI agents — with real-time inference on device for larger, more complex AI models. A Giant Leap for Real-Time Robot Reasoning Jetson Thor is built for generative reasoning models. It enables the next generation of physical AI agents — powered by large transformer models, vision language models and vision language action models — to run in real time at the edge while minimizing cloud dependency. Optimized with the Jetson software stack to enable the low latency and high performance required in real-world applications, Jetson Thor supports all popular generative AI frameworks and AI reasoning models with unmatched real-time performance. These include Cosmos Reason, DeepSeek, Llama, Gemini and Qwen models, as well as domain-specific models for robotics like Isaac GR00T N1.5, enabling any developer to easily experiment and run inference locally. NVIDIA Jetson Thor opens new capabilities for real-time reasoning with multi-sensor input. Further performance improvement is expected with FP4 and speculative decoding optimization. With NVIDIA CUDA ecosystem support through its lifecycle, Jetson Thor is expected to deliver even better throughput and faster responses with future software releases. Jetson Thor modules also run the full NVIDIA AI software stack to accelerate virtually every physical AI workflow with platforms including NVIDIA Isaac for robotics, NVIDIA Metropolis for video analytics AI agents and NVIDIA Holoscan for sensor processing. With these software tools, developers can easily build and deploy applications, such as visual AI agents that can analyze live camera streams to monitor worker safety, humanoid robots capable of manipulation tasks in unstructured environments and smart operating rooms that guide surgeons based on data from multi-camera streams. Jetson Thor Set to Advance Research Innovation  Research labs at Stanford University, Carnegie Mellon University and the University of Zurich are tapping Jetson Thor to push the boundaries of perception, planning and navigation models for a host of potential applications. At Carnegie Mellon’s Robotics Institute, a research team uses NVIDIA Jetson to power autonomous robots that can navigate complex, unstructured environments to conduct medical triage as well as search and rescue. “We can only do as much as the compute available allows,” said Sebastian Scherer, an associate research professor at the university and head of the AirLab. “Years ago, there was a big disconnect between computer vision and robotics because computer vision workloads were too slow for real-time decision-making — but now, models and computing have gotten fast enough so robots can handle much more nuanced tasks.” Scherer anticipates that by upgrading from his team’s existing NVIDIA Jetson AGX Orin systems to Jetson AGX Thor developer kit, they’ll improve the performance of AI models including their award-winning MAC-VO model for robot perception at the edge, boost their sensor-fusion capabilities and be able to experiment with robot fleets. Wield the Strength of Jetson Thor The Jetson Thor family includes a developer kit and production modules. The developer kit includes a Jetson T5000 module, a reference carrier board with abundant connectivity, an active heatsink with a fan and a power supply. NVIDIA Jetson AGX Thor Developer Kit The Jetson ecosystem supports a variety of application requirements, high-speed industrial automation protocols and sensor interfaces, accelerating time to market for enterprise developers. Hardware partners including Advantech, Aetina, ConnectTech, MiiVii and TZTEK are building production-ready Jetson Thor systems with flexible I/O and custom configurations in various form factors. Sensor and Actuator companies including Analog Devices, Inc., e-con Systems,  Infineon, Leopard Imaging, RealSense and Sensing are using NVIDIA Holoscan Sensor Bridge — a platform that simplifies sensor fusion and data streaming — to connect sensor data from cameras, radar, lidar and more directly to GPU memory on Jetson Thor with ultralow latency. Thousands of software companies can now elevate their traditional vision AI and robotics applications with multi-AI agent workflows running on Jetson Thor. Leading adopters include Openzeka, Rebotnix, Solomon and Vaidio. More than 2 million developers use NVIDIA technologies to accelerate robotics workflows. Get started with Jetson Thor by reading the NVIDIA Technical Blog and watching the developer kit walkthrough. To get hands-on experience with Jetson Thor, sign up to participate in upcoming hackathons with Seeed Studio and LeRobot by Hugging Face. The NVIDIA Jetson AGX Thor developer kit is available now starting at NVIDIA Jetson T5000 modules are available starting at for 1,000 units. Buy now from authorized NVIDIA partners. NVIDIA today also announced that the NVIDIA DRIVE AGX Thor developer kit, which provides a platform for developing autonomous vehicles and mobility solutions, is available for preorder. Deliveries are slated to start in September. #nvidia #jetson #thor #unlocks #realtime
    NVIDIA Jetson Thor Unlocks Real-Time Reasoning for General Robotics and Physical AI
    blogs.nvidia.com
    Robots around the world are about to get a lot smarter as physical AI developers plug in NVIDIA Jetson Thor modules — new robotics computers that can serve as the brains for robotic systems across research and industry. Robots demand rich sensor data and low-latency AI processing. Running real-time robotic applications requires significant AI compute and memory to handle concurrent data streams from multiple sensors. Jetson Thor, now in general availability, delivers 7.5x more AI compute, 3.1x more CPU performance and 2x more memory than its predecessor, the NVIDIA Jetson Orin, to make this possible on device. This performance leap will enable roboticists to process high-speed sensor data and perform visual reasoning at the edge — workflows that were previously too slow to run in dynamic real-world environments. This opens new possibilities for multimodal AI applications such as humanoid robotics. Agility Robotics, a leader in humanoid robotics, has integrated NVIDIA Jetson into the fifth generation of its robot, Digit — and plans to adopt Jetson Thor as the onboard compute platform for the sixth generation of Digit. This transition will enhance Digit’s real-time perception and decision-making capabilities, supporting increasingly complex AI skills and behaviors. Digit is commercially deployed and performs logistics tasks such as stacking, loading and palletizing in warehouse and manufacturing environments. “The powerful edge processing offered by Jetson Thor will take Digit to the next level — enhancing its real-time responsiveness and expanding its abilities to a broader, more complex set of skills,” said Peggy Johnson, CEO of Agility Robotics. “With Jetson Thor, we can deliver the latest physical AI advancements to optimize operations across our customers’ warehouses and factories.” Boston Dynamics — which has been building some of the industry’s most advanced robots for over 30 years — is integrating Jetson Thor into its humanoid robot Atlas, enabling Atlas to harness formerly server-level compute, AI workload acceleration, high-bandwidth data processing and significant memory on device. Beyond humanoids, Jetson Thor will accelerate various robotic applications — such as surgical assistants, smart tractors, delivery robots, industrial manipulators and visual AI agents — with real-time inference on device for larger, more complex AI models. A Giant Leap for Real-Time Robot Reasoning Jetson Thor is built for generative reasoning models. It enables the next generation of physical AI agents — powered by large transformer models, vision language models and vision language action models — to run in real time at the edge while minimizing cloud dependency. Optimized with the Jetson software stack to enable the low latency and high performance required in real-world applications, Jetson Thor supports all popular generative AI frameworks and AI reasoning models with unmatched real-time performance. These include Cosmos Reason, DeepSeek, Llama, Gemini and Qwen models, as well as domain-specific models for robotics like Isaac GR00T N1.5, enabling any developer to easily experiment and run inference locally. NVIDIA Jetson Thor opens new capabilities for real-time reasoning with multi-sensor input. Further performance improvement is expected with FP4 and speculative decoding optimization. With NVIDIA CUDA ecosystem support through its lifecycle, Jetson Thor is expected to deliver even better throughput and faster responses with future software releases. Jetson Thor modules also run the full NVIDIA AI software stack to accelerate virtually every physical AI workflow with platforms including NVIDIA Isaac for robotics, NVIDIA Metropolis for video analytics AI agents and NVIDIA Holoscan for sensor processing. With these software tools, developers can easily build and deploy applications, such as visual AI agents that can analyze live camera streams to monitor worker safety, humanoid robots capable of manipulation tasks in unstructured environments and smart operating rooms that guide surgeons based on data from multi-camera streams. Jetson Thor Set to Advance Research Innovation  Research labs at Stanford University, Carnegie Mellon University and the University of Zurich are tapping Jetson Thor to push the boundaries of perception, planning and navigation models for a host of potential applications. At Carnegie Mellon’s Robotics Institute, a research team uses NVIDIA Jetson to power autonomous robots that can navigate complex, unstructured environments to conduct medical triage as well as search and rescue. “We can only do as much as the compute available allows,” said Sebastian Scherer, an associate research professor at the university and head of the AirLab. “Years ago, there was a big disconnect between computer vision and robotics because computer vision workloads were too slow for real-time decision-making — but now, models and computing have gotten fast enough so robots can handle much more nuanced tasks.” Scherer anticipates that by upgrading from his team’s existing NVIDIA Jetson AGX Orin systems to Jetson AGX Thor developer kit, they’ll improve the performance of AI models including their award-winning MAC-VO model for robot perception at the edge, boost their sensor-fusion capabilities and be able to experiment with robot fleets. Wield the Strength of Jetson Thor The Jetson Thor family includes a developer kit and production modules. The developer kit includes a Jetson T5000 module, a reference carrier board with abundant connectivity, an active heatsink with a fan and a power supply. NVIDIA Jetson AGX Thor Developer Kit The Jetson ecosystem supports a variety of application requirements, high-speed industrial automation protocols and sensor interfaces, accelerating time to market for enterprise developers. Hardware partners including Advantech, Aetina, ConnectTech, MiiVii and TZTEK are building production-ready Jetson Thor systems with flexible I/O and custom configurations in various form factors. Sensor and Actuator companies including Analog Devices, Inc. (ADI), e-con Systems,  Infineon, Leopard Imaging, RealSense and Sensing are using NVIDIA Holoscan Sensor Bridge — a platform that simplifies sensor fusion and data streaming — to connect sensor data from cameras, radar, lidar and more directly to GPU memory on Jetson Thor with ultralow latency. Thousands of software companies can now elevate their traditional vision AI and robotics applications with multi-AI agent workflows running on Jetson Thor. Leading adopters include Openzeka, Rebotnix, Solomon and Vaidio. More than 2 million developers use NVIDIA technologies to accelerate robotics workflows. Get started with Jetson Thor by reading the NVIDIA Technical Blog and watching the developer kit walkthrough. To get hands-on experience with Jetson Thor, sign up to participate in upcoming hackathons with Seeed Studio and LeRobot by Hugging Face. The NVIDIA Jetson AGX Thor developer kit is available now starting at $3,499. NVIDIA Jetson T5000 modules are available starting at $2,999 for 1,000 units. Buy now from authorized NVIDIA partners. NVIDIA today also announced that the NVIDIA DRIVE AGX Thor developer kit, which provides a platform for developing autonomous vehicles and mobility solutions, is available for preorder. Deliveries are slated to start in September.
    Like
    Love
    Wow
    Sad
    Angry
    797
    · 2 Commentaires ·0 Parts
  • Report: Nintendo reportedly withholds Switch 2 dev kits, directs devs toward OG Switch development instead

    Developers large and small are reportedly having a hard time getting their hands on development kits for the Nintendo Switch 2. That news comes from the newly-independent Digital Foundry, which discussed the topic on this week's DF Directly Weekly livestream. During the stream, senior staff writer and video editor John Linneman explained that during the team's visit to Gamescom, they spoke with "a lot of developers" that said they're unable to get Switch 2 development kits."So many of them said the same thing," Linneman said in response to a question from the livestream chat. "They want to ship on the Switch 2. They would love to do Switch 2 versions, but they can't get the hardware." Some of these developers told Digital Foundry that they were told to ship their games on the original Nintendo Switch and rely on the Switch 2's backward compatibility features to be accessible on the new console. As of June 5 2025, the vast majority of Nintendo Switch games are playable on the Nintendo Switch 2. However, developing natively for the Switch 2 would help developers optimize their game for the new console's beefier hardware.Writer and video producer Oliver Mackenzie affirmed Linneman's report, saying that there have been "some weird exclusions with some big developers struggling to get kits for games."Related:"There were some weird inclusions as well," he added, explaining that while it's "nice" to see some independent developers have received kits, some triple-A developers aren't "necessarily in the pipeline.".Game Developer has reached out to Nintendo for comment and will update this story when a response is issued.
    #report #nintendo #reportedly #withholds #switch
    Report: Nintendo reportedly withholds Switch 2 dev kits, directs devs toward OG Switch development instead
    Developers large and small are reportedly having a hard time getting their hands on development kits for the Nintendo Switch 2. That news comes from the newly-independent Digital Foundry, which discussed the topic on this week's DF Directly Weekly livestream. During the stream, senior staff writer and video editor John Linneman explained that during the team's visit to Gamescom, they spoke with "a lot of developers" that said they're unable to get Switch 2 development kits."So many of them said the same thing," Linneman said in response to a question from the livestream chat. "They want to ship on the Switch 2. They would love to do Switch 2 versions, but they can't get the hardware." Some of these developers told Digital Foundry that they were told to ship their games on the original Nintendo Switch and rely on the Switch 2's backward compatibility features to be accessible on the new console. As of June 5 2025, the vast majority of Nintendo Switch games are playable on the Nintendo Switch 2. However, developing natively for the Switch 2 would help developers optimize their game for the new console's beefier hardware.Writer and video producer Oliver Mackenzie affirmed Linneman's report, saying that there have been "some weird exclusions with some big developers struggling to get kits for games."Related:"There were some weird inclusions as well," he added, explaining that while it's "nice" to see some independent developers have received kits, some triple-A developers aren't "necessarily in the pipeline.".Game Developer has reached out to Nintendo for comment and will update this story when a response is issued. #report #nintendo #reportedly #withholds #switch
    Report: Nintendo reportedly withholds Switch 2 dev kits, directs devs toward OG Switch development instead
    www.gamedeveloper.com
    Developers large and small are reportedly having a hard time getting their hands on development kits for the Nintendo Switch 2. That news comes from the newly-independent Digital Foundry, which discussed the topic on this week's DF Directly Weekly livestream. During the stream, senior staff writer and video editor John Linneman explained that during the team's visit to Gamescom, they spoke with "a lot of developers" that said they're unable to get Switch 2 development kits."So many of them said the same thing," Linneman said in response to a question from the livestream chat. "They want to ship on the Switch 2. They would love to do Switch 2 versions [of their games], but they can't get the hardware." Some of these developers told Digital Foundry that they were told to ship their games on the original Nintendo Switch and rely on the Switch 2's backward compatibility features to be accessible on the new console. As of June 5 2025, the vast majority of Nintendo Switch games are playable on the Nintendo Switch 2 (the major exceptions being the ones relying on custom hardware). However, developing natively for the Switch 2 would help developers optimize their game for the new console's beefier hardware.Writer and video producer Oliver Mackenzie affirmed Linneman's report, saying that there have been "some weird exclusions with some big developers struggling to get kits for games."Related:"There were some weird inclusions as well," he added, explaining that while it's "nice" to see some independent developers have received kits, some triple-A developers aren't "necessarily in the pipeline." (he cited Campfire and No Man's Sky developer Hello Games as an example).Game Developer has reached out to Nintendo for comment and will update this story when a response is issued.
    Like
    Love
    Wow
    Sad
    Angry
    680
    · 2 Commentaires ·0 Parts
  • Fur Grooming Techniques For Realistic Stitch In Blender

    IntroductionHi everyone! My name is Oleh Yakushev, and I'm a 3D Artist from Ukraine. My journey into 3D began just three years ago, when I was working as a mobile phone salesperson at a shopping mall. In 2022, during one slow day at work, I noticed a colleague learning Python. We started talking about life goals. I told him I wanted to switch careers, to do something creative, but programming wasn't really my thing.He asked me a simple question: "Well, what do you actually enjoy doing?"I said, "Video games. I love video games. But I don't have time to learn how to make them, I've got a job, a family, and a kid."Then he hit me with something that really shifted my whole perspective."Oleh, do you play games on your PlayStation?"I said, "Of course."He replied, "Then why not take the time you spend playing and use it to learn how to make games?"That moment flipped a switch in my mind. I realized that I did have time, it was just a matter of how I used it. If I really wanted to learn, I could find a way. At the time, I didn't even own a computer. But where there's a will, there's a way: I borrowed my sister's laptop for a month and started following beginner 3D tutorials on YouTube. Every night after work, once my family went to sleep, I'd sit in the kitchen and study. I stayed up until 2 or 3 AM, learning Blender basics. Then I'd sleep for a few hours before waking up at 6 AM to go back to work. That's how I spent my first few months in 3D, studying every single night.3D completely took over my life. During lunch breaks, I watched 3D videos, on the bus, I scrolled through 3D TikToks, at home, I took 3D courses, and the word "3D" just became a constant in my vocabulary.After a few months of learning the basics, I started building my portfolio, which looks pretty funny to me now. But at the time, it was a real sign of how committed I was. Eventually, someone reached out to me through Behance, offering my first freelance opportunity. And thatэs how my journey began, from mall clerk to 3D artist. It's been a tough road, full of burnout, doubts, and late nights... but also full of curiosity, growth, and hope. And I wouldn't trade it for anything.The Stitch ProjectI've loved Stitch since I was a kid. I used to watch the cartoons, play the video games, and he always felt like such a warm, funny, chill, and at the same time, strong character. So once I reached a certain level in 3D, I decided to recreate Stitch.Back then, my skills only allowed me to make him in a stylized cartoonish style, no fur, no complex detailing, no advanced texturing, I just didn't have the experience. Surprisingly, the result turned out pretty decent. Even now, I sometimes get comments that my old Stitch still looks quite cute. Though honestly, I wouldn't say that myself anymore. Two years have passed since I made that first Stitch, it was back in 2023. And in 2025, I decided it was time to challenge myself.At that point, I had just completed an intense grooming course. Grooming always intimidated me, it felt really complex. I avoided it on commercial projects, made a few failed attempts for my portfolio, and overall tried to steer clear of any tasks where grooming was required. But eventually, I found the strength to face it.I pushed myself to learn how to make great fur, and I did. I finally understood how the grooming system works, grasped the logic, the tools, and the workflow. And after finishing the course, I wanted to lock in all that knowledge by creating a full personal project from scratch.So my goal was to make a character from the ground up, where the final stage would be grooming. And without thinking too long, I chose Stitch.First, because I truly love the character. Second, I wanted to clearly see my own progress over the past two years. Third, I needed to put my new skills to the test and find out whether my training had really paid off.ModelingI had a few ideas for how to approach the base mesh for this project. First, to model everything completely from scratch, starting with a sphere. Second, to reuse my old Stitch model and upgrade it.But then an idea struck me: why not test how well AI could handle a base mesh? I gathered some references and tried generating a base mesh using AI, uploading Stitch visuals as a guide. As you can see from the screenshot, the result was far from usable. So I basically ended up doing everything from scratch anyway.So, I went back to basics: digging through ArtStation and Pinterest, collecting references. Since over the last two years, I had not only learned grooming but also completely changed my overall approach to character creation, it was important for me to make a more detailed model, even if much of it would be hidden under fur.The first Stitch was sculpted in Blender, with all the limitations that come with sculpting in it. But since then, I've leveled up significantly and switched to more advanced tools. So this second version of Stitch was born in ZBrush. By the time I started working on this Stitch, ZBrush had already become my second main workspace. I've used it to deliver tons of commercial projects, I work in it almost daily, and most of my portfolio was created using this tool. I found some great reference images showing Stitch's body structure. Among them were official movie references and a stunning high-poly model created by Juan Hernández, a version of Stitch without fur. That model became my primary reference for sculpting.Truth is, Stitch's base form is quite simple, so blocking out the shape didn't take too long. When blocking, I use Blender in combination with ZBrush:I work with primary forms in ZBrushThen check proportions in BlenderFix mistakes, tweak volumes, and refine the silhouetteSince Stitch's shape isn't overly complex, I broke him down into three main sculpting parts:The body: arms, legs, head, and earsThe nose, eyes, and mouth cavityWhile planning the sculpt, I already knew I'd be rigging Stitch, both body and facial rig. So I started sculpting with his mouth open.While studying various references, I noticed something interesting. Stitch from promotional posters, Stitch from the movie, and Stitch as recreated by different artists on ArtStation all look very different from one another. What surprised me the most was how different the promo version of Stitch is compared to the one in the actual movie. They are essentially two separate models:Different proportionsDifferent shapesDifferent texturesEven different fur and overall designThis presented a creative challenge, I had to develop my own take on Stitch's design. Sometimes I liked the way the teeth were done in one version, in another, the eye placement, in another, the fur shape, or the claw design on hands and feet.At first, considering that Stitch is completely covered in fur from head to toe, sculpting his underlying anatomy seemed pointless. I kept asking myself: "Why sculpt muscles and skin detail if everything will be hidden under fur anyway?"But eventually, I found a few solid answers for myself. First, having a defined muscle structure actually makes the fur grooming process easier. That's because fur often follows the flow of muscle lines, so having those muscles helps guide fur direction more accurately across the character's body.Second, it's great anatomy practice, and practice is never a waste. So, I found a solid anatomical reference of Stitch with clearly visible muscle groups and tried to recreate that structure as closely as possible in my own sculpt.In the end, I had to develop a full visual concept by combining elements from multiple versions of Stitch. Through careful reference work and constantly switching between Blender and ZBrush, I gradually, but intentionally, built up the body and overall look of our favorite fluffy alien.Topology & UVsThroughout the sculpting process, I spent quite a bit of time thinking about topology. I was looking for the most balanced solution between quality and production time. Normally, I do manual retopology for my characters, but this time, I knew it would take too much time, and honestly, I didn't have that luxury.So I decided to generate the topology using ZBrush's tools. I split the model into separate parts using Polygroups, assigning individual groups for the ears, the head, the torso, the arms, the legs, and each of Stitch's fingers.With the Polygroups in place, I used ZRemesher with Keep Groups enabled and smoothing on group borders. This gave me a clean and optimized mesh that was perfect for UV unwrapping.Of course, this kind of auto-retopology isn't a full substitute for manual work, but it saved me a huge amount of time, and the quality was still high enough for what I needed. However, there was one tricky issue. Although Stitch looks symmetrical at first glance, his ears are actually asymmetrical. The right ear has a scar on the top, while the left has a scar on the bottomBecause of that, I couldn't just mirror one side in ZBrush without losing those unique features. Here's what I ended up doing: I created a symmetrical model with the right ear, then another symmetrical model with the left ear. I brought both into Blender, detached the left ear from one model, and attached it to the body of the other one. This way, I got a clean, symmetrical base mesh with asymmetrical ears, preserving both topology and detail. And thanks to the clean polygroup-based layout, I was able to unwrap the UVs with nice, even seams and clean islands.When it came to UV mapping, I divided Stitch into two UDIM tiles:The first UDIM includes the head with ears, torso, arms, and legs.The second UDIM contains all the additional parts: teeth, tongue, gums, claws, and noseSince the nose is one of the most important details, I allocated the largest space to it, which helped me to better capture its intricate details.As for the eyes, I used procedural eyes, so there was no need to assign UV space or create a separate UDIM for texturing them. To achieve this, I used the Tiny Eye add-on by tinynocky for Blender, which allows full control over procedural eyes and their parameters.This approach gave me high-quality eyes with customizable elements tailored exactly to my needs. As a result of all these steps, Stitch ended up with a symmetrical, optimized mesh, asymmetrical ears, and the body split across two UDIMs, one for the main body and one for the additional parts.TexturingWhen planning Stitch's texturing, I understood that the main body texture would be fairly simple, with much of the visual detail enhanced by the fur. However, there were some areas that required much more attention than the rest of the body. The textures for Stitch can be roughly divided into several main parts:The base body, which includes the primary color of his fur, along with additional shading like a lighter tone on the frontand a darker tone on the back and napeThe nose and ears, these zones, demanded separate focusAt the initial texturing/blocking stage, the ears looked too cartoony, which didn’t fit the style I wanted. So, I decided to push them towards a more realistic look. This involved removing bright colors, adding more variation in the roughness map, introducing variation in the base color, and making the ears visually more natural, layered, and textured on the surface. By combining smart materials and masks, I achieved the effect of "living" ears, slightly dirty and looking as natural as possible.The nose was a separate story. It occupies a significant part of the face and thus draws a lot of attention. While studying references, I noticed that the shape and texture of the nose vary a lot between different artists. Initially, I made it dog-like, with some wear and tear around the nostrils and base.For a long time, I thought this version was acceptable. But during test renders, I realized the nose needed improvement. So I reworked its texturing, aiming to make it more detailed. I divided the nose texture into four main layers:Base detail: Baked from the high-poly model. Over this, I applied a smart skin material that added characteristic bumps.Lighter layer: Applied via a mask using the AO channel. This darkened the crevices and brightened the bumps, creating a multi-layered effect.Organic detail: In animal references, I noticed slight redness in the nose area. I created another AO-masked layer with reddish capillaries visible through the bumps, adding depth and realism.Softness: To make the nose visually softer, like in references, I added a fill layer with only height enabled, used a paper texture as grayscale, and applied a blurred mask. This created subtle dents and wrinkles that softened the look.All textures were created in 4K resolution to achieve maximum detail. After finishing the main texturing stage, I add an Ambient Occlusion map on the final texture layer, activating only the Color channel, setting the blend mode to Multiply, and reducing opacity to about 35%. This adds volume and greatly improves the overall perception of the model.That covers the texturing of Stitch’s body. I also created a separate texture for the fur. This was simpler, I disabled unnecessary layers like ears and eyelids, and left only the base ones corresponding to the body’s color tones.During grooming, I also created textures for the fur's clamps and roughness. In Substance 3D Painter, I additionally painted masks for better fur detail.FurAnd finally, I moved on to the part that was most important to me, the very reason I started this project in the first place. Fur. This entire process was essentially a test of my fur grooming skills. After overcoming self-doubt, I trusted the process and relied on everything I had learned so far. Before diving into the grooming itself, I made sure to gather strong references. I searched for the highest quality and most inspiring examples I could find and analyzed them thoroughly. My goal was to clearly understand the direction of fur growth, its density and volume, the intensity of roughness, and the strength of clumping in different areas of Stitch's body.To create the fur, I used Blender and its Hair Particle System. The overall approach is similar to sculpting a high-detail model: work from broad strokes to finer details. So, the first step was blocking out the main flow and placement of the hair strands.At this point, I ran into a challenge: symmetry. Since the model was purposefully asymmetrical, the fur couldn't be mirrored cleanly. To solve this, I created a base fur blocking using Hair Guides with just two segments. After that, I split the fur into separate parts. I duplicated the main Particle System and created individual hair systems for each area where needed.In total, I broke Stitch's body into key sections: head, left ear, right ear, front torso, back torso, arms, hands, upper and lower legs, toes, and additional detailing layers. The final fur setup included 25 separate particle systems.To control fur growth, I used Weight Paint to fine-tune the influence on each body part individually. This separation gave me much more precision and allowed full control over every parameter of the fur on a per-section basis.The most challenging aspect of working with fur is staying patient and focused. Detail is absolutely critical because the overall picture is built entirely from tiny, subtle elements. Once the base layer was complete, I moved on to refining the fur based on my references.The most complex areas turned out to be the front of the torso and the face. When working on the torso, my goal was to create a smooth gradient, from thick, clumped fur on the chest to shorter, softer fur on the stomach.Step by step, I adjusted the transitions, directions, clumps, and volumes to achieve that look. Additionally, I used the fur itself to subtly enhance Stitch's silhouette, making his overall shape feel sharper, more expressive, and visually engaging.During fur development, I used texture maps to control the intensity of the Roughness and Clump parameters. This gave me a high degree of flexibility, textures drove these attributes across the entire model. In areas where stronger clumping or roughness was needed, I used brighter values; in zones requiring a softer look, darker values. This approach allowed for fine-tuned micro-level control of the fur shader and helped achieve a highly realistic appearance in renders.The face required special attention: the fur had to be neat, evenly distributed, and still visually appealing. The biggest challenge here was working around the eye area. Even with properly adjusted Weight Paint, interpolation sometimes caused strands to creep into the eyes.I spent a lot of time cleaning up this region to get an optimal result. I also had to revisit certain patches that looked bald, even though interpolation and weight painting were set correctly, because the fur didn't render properly there. These areas needed manual fixing.As part of the detailing stage, I also increased the number of segments in the Hair Guides.While the blocking phase only used two segments, I went up to three, and in some cases even five, for more complex regions. This gave me much more control over fur shape and flow.The tiniest details really matter, so I added extra fur layers with thinner, more chaotic strands extending slightly beyond the main silhouette. These micro-layers significantly improved the texture depth and boosted the overall realism.Aside from the grooming itself, I paid special attention to the fur material setup, as the shader plays a critical role in the final visual quality of the render. It's not enough to simply plug a color texture into a Principled BSDF node and call it done.I built a more complex shader, giving me precise control over various attributes. For example, I implemented subtle color variation across individual strands, along with darkening near the roots and a gradual brightening toward the tips. This helped add visual depth and made the fur look significantly more natural and lifelike.Working on the fur took up nearly half of the total time I spent on the entire model. And I'm genuinely happy with the result, this stage confirmed that the training I've gone through was solid and that I’m heading in the right direction with my artistic development.Rigging, Posing & SceneOnce I finished working on the fur, I rendered several 4K test shots from different angles to make sure every detail looked the way I intended. When I was fully satisfied with the results, it was time to move on to rigging.I divided the rigging process into three main parts:Body rig, for posing and positioning the characterFacial rig, for expressions and emotionsEar rig, for dynamic ear controlRigging isn't something I consider my strongest skill, but as a 3D generalist, I had to dive into many technical aspects of it. For the ears, I set up a relatively simple system with several bones connected using inverse kinematics. This gave me flexible and intuitive control during posing and allowed for the addition of dynamic movement in animation.For facial rigging, I used the FaceIt add-on, which generates a complete facial control system for mouth, eyes, and tongue. It sped up the process significantly and gave me more precision. For the body, I used the ActorCore Rig by NVIDIA, then converted it to Rigify, which gave me a familiar interface and flexible control over poses.Posing is one of my favorite stages, it's when the character really comes to life. As usual, it started with gathering references. Honestly, it was hard to pick the final poses, Stitch is so expressive and full of personality that I wanted to try hundreds of them. But I focused on those that best conveyed the spirit and mood of the character. Some poses I reworked to fit my style rather than copying directly. For example, in the pose where Stitch licks his nose, I added drool and a bit of "green slime" for comedic effect. To capture motion, I tilted his head back and made the ears fly upward, creating a vivid, emotional snapshot.Just like in sculpting or grooming, minor details make a big difference in posing. Examples include: a slight asymmetry in the facial expression, a raised corner of the mouth, one eye squinting a little more than the other, and ears set at slightly different angles.These are subtle things that might not be noticed immediately, but they’re the key to making the character feel alive and believable.For each pose, I created a separate scene and collection in Blender, including the character, specific lighting setup, and a simple background or environment. This made it easy to return to any scene later, to adjust lighting, reposition the character, or tweak the background.In one of the renders, which I used as the cover image, Stitch is holding a little frog.I want to clearly note that the 3D model of the frog is not mine, full credit goes to the original author of the asset.At first, I wanted to build a full environment around Stitch, to create a scene that would feel like a frame from a film. But after carefully evaluating my skills and priorities, I decided that a weak environment would only detract from the strength of the character. So I opted for a simple, neutral backdrop, designed to keep all the focus on Stitch himself.Rendering, Lighting & Post-ProcessingWhen the character is complete, posed expressively, and integrated into the scene, there's one final step: lighting. Lighting isn't just a technical element of the scene — it’s a full-fledged stage of the 3D pipeline. It doesn't just illuminate; it paints. Proper lighting can highlight the personality of the character, emphasize forms, and create atmosphere.For all my renders, I rely on the classic three-point lighting setup: Key Light, Fill Light, and Rim Light.While this setup is well-known, it remains highly effective. When done thoughtfully, with the right intensity, direction, and color temperature, it creates a strong light-shadow composition that brings the model to life. In addition to the three main lights, I also use an HDRI map, but with very low intensity, around 0.3, just enough to subtly enrich the ambient light without overpowering the scene.Once everything is set, it's time to hit Render and wait for the result. Due to hardware limitations, I wasn’t able to produce full animated shots with fur. Rendering a single 4K image with fur took over an hour, so I limited myself to a 360° turnaround and several static renders.I don't spend too much time on post-processing, just basic refinements in Photoshop. Slight enhancement of the composition, gentle shadow adjustments, color balance tweaks, and adding a logo. Everything is done subtly, nothing overprocessed. The goal is simply to support and enhance what’s already there.Final ThoughtsThis project has been an incredible experience. Although it was my second time creating Stitch, this time the process felt completely different at every stage. And honestly, it wasn't easy.But that was exactly the point: to challenge myself. To reimagine something familiar, to try things I'd never done before, and to walk the full journey from start to finish. The fur, the heart of this project, was especially meaningful to me. It’s what started it all. I poured a lot into this model: time, effort, emotion, and even doubts. But at the same time, I brought all my knowledge, skills, and experience into it.This work became a mirror of my progress from 2023 to 2025. I can clearly see how far I've come, and that gives me the motivation to keep going. Every hour of learning and practice paid off, the results speak for themselves. This model was created for my portfolio. I don't plan to use it commercially, unless, of course, a studio actually wants to license it for a new filmIt's been a long road: challenging, sometimes exhausting, but above all inspiring and exciting. I know there's still a lot to learn. Many things to study, improve, and polish to perfection. But I'm already on that path, and I'm not stopping.Oleh Yakushev, 3D Character ArtistInterview conducted by Gloria Levine
    #fur #grooming #techniques #realistic #stitch
    Fur Grooming Techniques For Realistic Stitch In Blender
    IntroductionHi everyone! My name is Oleh Yakushev, and I'm a 3D Artist from Ukraine. My journey into 3D began just three years ago, when I was working as a mobile phone salesperson at a shopping mall. In 2022, during one slow day at work, I noticed a colleague learning Python. We started talking about life goals. I told him I wanted to switch careers, to do something creative, but programming wasn't really my thing.He asked me a simple question: "Well, what do you actually enjoy doing?"I said, "Video games. I love video games. But I don't have time to learn how to make them, I've got a job, a family, and a kid."Then he hit me with something that really shifted my whole perspective."Oleh, do you play games on your PlayStation?"I said, "Of course."He replied, "Then why not take the time you spend playing and use it to learn how to make games?"That moment flipped a switch in my mind. I realized that I did have time, it was just a matter of how I used it. If I really wanted to learn, I could find a way. At the time, I didn't even own a computer. But where there's a will, there's a way: I borrowed my sister's laptop for a month and started following beginner 3D tutorials on YouTube. Every night after work, once my family went to sleep, I'd sit in the kitchen and study. I stayed up until 2 or 3 AM, learning Blender basics. Then I'd sleep for a few hours before waking up at 6 AM to go back to work. That's how I spent my first few months in 3D, studying every single night.3D completely took over my life. During lunch breaks, I watched 3D videos, on the bus, I scrolled through 3D TikToks, at home, I took 3D courses, and the word "3D" just became a constant in my vocabulary.After a few months of learning the basics, I started building my portfolio, which looks pretty funny to me now. But at the time, it was a real sign of how committed I was. Eventually, someone reached out to me through Behance, offering my first freelance opportunity. And thatэs how my journey began, from mall clerk to 3D artist. It's been a tough road, full of burnout, doubts, and late nights... but also full of curiosity, growth, and hope. And I wouldn't trade it for anything.The Stitch ProjectI've loved Stitch since I was a kid. I used to watch the cartoons, play the video games, and he always felt like such a warm, funny, chill, and at the same time, strong character. So once I reached a certain level in 3D, I decided to recreate Stitch.Back then, my skills only allowed me to make him in a stylized cartoonish style, no fur, no complex detailing, no advanced texturing, I just didn't have the experience. Surprisingly, the result turned out pretty decent. Even now, I sometimes get comments that my old Stitch still looks quite cute. Though honestly, I wouldn't say that myself anymore. Two years have passed since I made that first Stitch, it was back in 2023. And in 2025, I decided it was time to challenge myself.At that point, I had just completed an intense grooming course. Grooming always intimidated me, it felt really complex. I avoided it on commercial projects, made a few failed attempts for my portfolio, and overall tried to steer clear of any tasks where grooming was required. But eventually, I found the strength to face it.I pushed myself to learn how to make great fur, and I did. I finally understood how the grooming system works, grasped the logic, the tools, and the workflow. And after finishing the course, I wanted to lock in all that knowledge by creating a full personal project from scratch.So my goal was to make a character from the ground up, where the final stage would be grooming. And without thinking too long, I chose Stitch.First, because I truly love the character. Second, I wanted to clearly see my own progress over the past two years. Third, I needed to put my new skills to the test and find out whether my training had really paid off.ModelingI had a few ideas for how to approach the base mesh for this project. First, to model everything completely from scratch, starting with a sphere. Second, to reuse my old Stitch model and upgrade it.But then an idea struck me: why not test how well AI could handle a base mesh? I gathered some references and tried generating a base mesh using AI, uploading Stitch visuals as a guide. As you can see from the screenshot, the result was far from usable. So I basically ended up doing everything from scratch anyway.So, I went back to basics: digging through ArtStation and Pinterest, collecting references. Since over the last two years, I had not only learned grooming but also completely changed my overall approach to character creation, it was important for me to make a more detailed model, even if much of it would be hidden under fur.The first Stitch was sculpted in Blender, with all the limitations that come with sculpting in it. But since then, I've leveled up significantly and switched to more advanced tools. So this second version of Stitch was born in ZBrush. By the time I started working on this Stitch, ZBrush had already become my second main workspace. I've used it to deliver tons of commercial projects, I work in it almost daily, and most of my portfolio was created using this tool. I found some great reference images showing Stitch's body structure. Among them were official movie references and a stunning high-poly model created by Juan Hernández, a version of Stitch without fur. That model became my primary reference for sculpting.Truth is, Stitch's base form is quite simple, so blocking out the shape didn't take too long. When blocking, I use Blender in combination with ZBrush:I work with primary forms in ZBrushThen check proportions in BlenderFix mistakes, tweak volumes, and refine the silhouetteSince Stitch's shape isn't overly complex, I broke him down into three main sculpting parts:The body: arms, legs, head, and earsThe nose, eyes, and mouth cavityWhile planning the sculpt, I already knew I'd be rigging Stitch, both body and facial rig. So I started sculpting with his mouth open.While studying various references, I noticed something interesting. Stitch from promotional posters, Stitch from the movie, and Stitch as recreated by different artists on ArtStation all look very different from one another. What surprised me the most was how different the promo version of Stitch is compared to the one in the actual movie. They are essentially two separate models:Different proportionsDifferent shapesDifferent texturesEven different fur and overall designThis presented a creative challenge, I had to develop my own take on Stitch's design. Sometimes I liked the way the teeth were done in one version, in another, the eye placement, in another, the fur shape, or the claw design on hands and feet.At first, considering that Stitch is completely covered in fur from head to toe, sculpting his underlying anatomy seemed pointless. I kept asking myself: "Why sculpt muscles and skin detail if everything will be hidden under fur anyway?"But eventually, I found a few solid answers for myself. First, having a defined muscle structure actually makes the fur grooming process easier. That's because fur often follows the flow of muscle lines, so having those muscles helps guide fur direction more accurately across the character's body.Second, it's great anatomy practice, and practice is never a waste. So, I found a solid anatomical reference of Stitch with clearly visible muscle groups and tried to recreate that structure as closely as possible in my own sculpt.In the end, I had to develop a full visual concept by combining elements from multiple versions of Stitch. Through careful reference work and constantly switching between Blender and ZBrush, I gradually, but intentionally, built up the body and overall look of our favorite fluffy alien.Topology & UVsThroughout the sculpting process, I spent quite a bit of time thinking about topology. I was looking for the most balanced solution between quality and production time. Normally, I do manual retopology for my characters, but this time, I knew it would take too much time, and honestly, I didn't have that luxury.So I decided to generate the topology using ZBrush's tools. I split the model into separate parts using Polygroups, assigning individual groups for the ears, the head, the torso, the arms, the legs, and each of Stitch's fingers.With the Polygroups in place, I used ZRemesher with Keep Groups enabled and smoothing on group borders. This gave me a clean and optimized mesh that was perfect for UV unwrapping.Of course, this kind of auto-retopology isn't a full substitute for manual work, but it saved me a huge amount of time, and the quality was still high enough for what I needed. However, there was one tricky issue. Although Stitch looks symmetrical at first glance, his ears are actually asymmetrical. The right ear has a scar on the top, while the left has a scar on the bottomBecause of that, I couldn't just mirror one side in ZBrush without losing those unique features. Here's what I ended up doing: I created a symmetrical model with the right ear, then another symmetrical model with the left ear. I brought both into Blender, detached the left ear from one model, and attached it to the body of the other one. This way, I got a clean, symmetrical base mesh with asymmetrical ears, preserving both topology and detail. And thanks to the clean polygroup-based layout, I was able to unwrap the UVs with nice, even seams and clean islands.When it came to UV mapping, I divided Stitch into two UDIM tiles:The first UDIM includes the head with ears, torso, arms, and legs.The second UDIM contains all the additional parts: teeth, tongue, gums, claws, and noseSince the nose is one of the most important details, I allocated the largest space to it, which helped me to better capture its intricate details.As for the eyes, I used procedural eyes, so there was no need to assign UV space or create a separate UDIM for texturing them. To achieve this, I used the Tiny Eye add-on by tinynocky for Blender, which allows full control over procedural eyes and their parameters.This approach gave me high-quality eyes with customizable elements tailored exactly to my needs. As a result of all these steps, Stitch ended up with a symmetrical, optimized mesh, asymmetrical ears, and the body split across two UDIMs, one for the main body and one for the additional parts.TexturingWhen planning Stitch's texturing, I understood that the main body texture would be fairly simple, with much of the visual detail enhanced by the fur. However, there were some areas that required much more attention than the rest of the body. The textures for Stitch can be roughly divided into several main parts:The base body, which includes the primary color of his fur, along with additional shading like a lighter tone on the frontand a darker tone on the back and napeThe nose and ears, these zones, demanded separate focusAt the initial texturing/blocking stage, the ears looked too cartoony, which didn’t fit the style I wanted. So, I decided to push them towards a more realistic look. This involved removing bright colors, adding more variation in the roughness map, introducing variation in the base color, and making the ears visually more natural, layered, and textured on the surface. By combining smart materials and masks, I achieved the effect of "living" ears, slightly dirty and looking as natural as possible.The nose was a separate story. It occupies a significant part of the face and thus draws a lot of attention. While studying references, I noticed that the shape and texture of the nose vary a lot between different artists. Initially, I made it dog-like, with some wear and tear around the nostrils and base.For a long time, I thought this version was acceptable. But during test renders, I realized the nose needed improvement. So I reworked its texturing, aiming to make it more detailed. I divided the nose texture into four main layers:Base detail: Baked from the high-poly model. Over this, I applied a smart skin material that added characteristic bumps.Lighter layer: Applied via a mask using the AO channel. This darkened the crevices and brightened the bumps, creating a multi-layered effect.Organic detail: In animal references, I noticed slight redness in the nose area. I created another AO-masked layer with reddish capillaries visible through the bumps, adding depth and realism.Softness: To make the nose visually softer, like in references, I added a fill layer with only height enabled, used a paper texture as grayscale, and applied a blurred mask. This created subtle dents and wrinkles that softened the look.All textures were created in 4K resolution to achieve maximum detail. After finishing the main texturing stage, I add an Ambient Occlusion map on the final texture layer, activating only the Color channel, setting the blend mode to Multiply, and reducing opacity to about 35%. This adds volume and greatly improves the overall perception of the model.That covers the texturing of Stitch’s body. I also created a separate texture for the fur. This was simpler, I disabled unnecessary layers like ears and eyelids, and left only the base ones corresponding to the body’s color tones.During grooming, I also created textures for the fur's clamps and roughness. In Substance 3D Painter, I additionally painted masks for better fur detail.FurAnd finally, I moved on to the part that was most important to me, the very reason I started this project in the first place. Fur. This entire process was essentially a test of my fur grooming skills. After overcoming self-doubt, I trusted the process and relied on everything I had learned so far. Before diving into the grooming itself, I made sure to gather strong references. I searched for the highest quality and most inspiring examples I could find and analyzed them thoroughly. My goal was to clearly understand the direction of fur growth, its density and volume, the intensity of roughness, and the strength of clumping in different areas of Stitch's body.To create the fur, I used Blender and its Hair Particle System. The overall approach is similar to sculpting a high-detail model: work from broad strokes to finer details. So, the first step was blocking out the main flow and placement of the hair strands.At this point, I ran into a challenge: symmetry. Since the model was purposefully asymmetrical, the fur couldn't be mirrored cleanly. To solve this, I created a base fur blocking using Hair Guides with just two segments. After that, I split the fur into separate parts. I duplicated the main Particle System and created individual hair systems for each area where needed.In total, I broke Stitch's body into key sections: head, left ear, right ear, front torso, back torso, arms, hands, upper and lower legs, toes, and additional detailing layers. The final fur setup included 25 separate particle systems.To control fur growth, I used Weight Paint to fine-tune the influence on each body part individually. This separation gave me much more precision and allowed full control over every parameter of the fur on a per-section basis.The most challenging aspect of working with fur is staying patient and focused. Detail is absolutely critical because the overall picture is built entirely from tiny, subtle elements. Once the base layer was complete, I moved on to refining the fur based on my references.The most complex areas turned out to be the front of the torso and the face. When working on the torso, my goal was to create a smooth gradient, from thick, clumped fur on the chest to shorter, softer fur on the stomach.Step by step, I adjusted the transitions, directions, clumps, and volumes to achieve that look. Additionally, I used the fur itself to subtly enhance Stitch's silhouette, making his overall shape feel sharper, more expressive, and visually engaging.During fur development, I used texture maps to control the intensity of the Roughness and Clump parameters. This gave me a high degree of flexibility, textures drove these attributes across the entire model. In areas where stronger clumping or roughness was needed, I used brighter values; in zones requiring a softer look, darker values. This approach allowed for fine-tuned micro-level control of the fur shader and helped achieve a highly realistic appearance in renders.The face required special attention: the fur had to be neat, evenly distributed, and still visually appealing. The biggest challenge here was working around the eye area. Even with properly adjusted Weight Paint, interpolation sometimes caused strands to creep into the eyes.I spent a lot of time cleaning up this region to get an optimal result. I also had to revisit certain patches that looked bald, even though interpolation and weight painting were set correctly, because the fur didn't render properly there. These areas needed manual fixing.As part of the detailing stage, I also increased the number of segments in the Hair Guides.While the blocking phase only used two segments, I went up to three, and in some cases even five, for more complex regions. This gave me much more control over fur shape and flow.The tiniest details really matter, so I added extra fur layers with thinner, more chaotic strands extending slightly beyond the main silhouette. These micro-layers significantly improved the texture depth and boosted the overall realism.Aside from the grooming itself, I paid special attention to the fur material setup, as the shader plays a critical role in the final visual quality of the render. It's not enough to simply plug a color texture into a Principled BSDF node and call it done.I built a more complex shader, giving me precise control over various attributes. For example, I implemented subtle color variation across individual strands, along with darkening near the roots and a gradual brightening toward the tips. This helped add visual depth and made the fur look significantly more natural and lifelike.Working on the fur took up nearly half of the total time I spent on the entire model. And I'm genuinely happy with the result, this stage confirmed that the training I've gone through was solid and that I’m heading in the right direction with my artistic development.Rigging, Posing & SceneOnce I finished working on the fur, I rendered several 4K test shots from different angles to make sure every detail looked the way I intended. When I was fully satisfied with the results, it was time to move on to rigging.I divided the rigging process into three main parts:Body rig, for posing and positioning the characterFacial rig, for expressions and emotionsEar rig, for dynamic ear controlRigging isn't something I consider my strongest skill, but as a 3D generalist, I had to dive into many technical aspects of it. For the ears, I set up a relatively simple system with several bones connected using inverse kinematics. This gave me flexible and intuitive control during posing and allowed for the addition of dynamic movement in animation.For facial rigging, I used the FaceIt add-on, which generates a complete facial control system for mouth, eyes, and tongue. It sped up the process significantly and gave me more precision. For the body, I used the ActorCore Rig by NVIDIA, then converted it to Rigify, which gave me a familiar interface and flexible control over poses.Posing is one of my favorite stages, it's when the character really comes to life. As usual, it started with gathering references. Honestly, it was hard to pick the final poses, Stitch is so expressive and full of personality that I wanted to try hundreds of them. But I focused on those that best conveyed the spirit and mood of the character. Some poses I reworked to fit my style rather than copying directly. For example, in the pose where Stitch licks his nose, I added drool and a bit of "green slime" for comedic effect. To capture motion, I tilted his head back and made the ears fly upward, creating a vivid, emotional snapshot.Just like in sculpting or grooming, minor details make a big difference in posing. Examples include: a slight asymmetry in the facial expression, a raised corner of the mouth, one eye squinting a little more than the other, and ears set at slightly different angles.These are subtle things that might not be noticed immediately, but they’re the key to making the character feel alive and believable.For each pose, I created a separate scene and collection in Blender, including the character, specific lighting setup, and a simple background or environment. This made it easy to return to any scene later, to adjust lighting, reposition the character, or tweak the background.In one of the renders, which I used as the cover image, Stitch is holding a little frog.I want to clearly note that the 3D model of the frog is not mine, full credit goes to the original author of the asset.At first, I wanted to build a full environment around Stitch, to create a scene that would feel like a frame from a film. But after carefully evaluating my skills and priorities, I decided that a weak environment would only detract from the strength of the character. So I opted for a simple, neutral backdrop, designed to keep all the focus on Stitch himself.Rendering, Lighting & Post-ProcessingWhen the character is complete, posed expressively, and integrated into the scene, there's one final step: lighting. Lighting isn't just a technical element of the scene — it’s a full-fledged stage of the 3D pipeline. It doesn't just illuminate; it paints. Proper lighting can highlight the personality of the character, emphasize forms, and create atmosphere.For all my renders, I rely on the classic three-point lighting setup: Key Light, Fill Light, and Rim Light.While this setup is well-known, it remains highly effective. When done thoughtfully, with the right intensity, direction, and color temperature, it creates a strong light-shadow composition that brings the model to life. In addition to the three main lights, I also use an HDRI map, but with very low intensity, around 0.3, just enough to subtly enrich the ambient light without overpowering the scene.Once everything is set, it's time to hit Render and wait for the result. Due to hardware limitations, I wasn’t able to produce full animated shots with fur. Rendering a single 4K image with fur took over an hour, so I limited myself to a 360° turnaround and several static renders.I don't spend too much time on post-processing, just basic refinements in Photoshop. Slight enhancement of the composition, gentle shadow adjustments, color balance tweaks, and adding a logo. Everything is done subtly, nothing overprocessed. The goal is simply to support and enhance what’s already there.Final ThoughtsThis project has been an incredible experience. Although it was my second time creating Stitch, this time the process felt completely different at every stage. And honestly, it wasn't easy.But that was exactly the point: to challenge myself. To reimagine something familiar, to try things I'd never done before, and to walk the full journey from start to finish. The fur, the heart of this project, was especially meaningful to me. It’s what started it all. I poured a lot into this model: time, effort, emotion, and even doubts. But at the same time, I brought all my knowledge, skills, and experience into it.This work became a mirror of my progress from 2023 to 2025. I can clearly see how far I've come, and that gives me the motivation to keep going. Every hour of learning and practice paid off, the results speak for themselves. This model was created for my portfolio. I don't plan to use it commercially, unless, of course, a studio actually wants to license it for a new filmIt's been a long road: challenging, sometimes exhausting, but above all inspiring and exciting. I know there's still a lot to learn. Many things to study, improve, and polish to perfection. But I'm already on that path, and I'm not stopping.Oleh Yakushev, 3D Character ArtistInterview conducted by Gloria Levine #fur #grooming #techniques #realistic #stitch
    Fur Grooming Techniques For Realistic Stitch In Blender
    80.lv
    IntroductionHi everyone! My name is Oleh Yakushev, and I'm a 3D Artist from Ukraine. My journey into 3D began just three years ago, when I was working as a mobile phone salesperson at a shopping mall. In 2022, during one slow day at work, I noticed a colleague learning Python. We started talking about life goals. I told him I wanted to switch careers, to do something creative, but programming wasn't really my thing.He asked me a simple question: "Well, what do you actually enjoy doing?"I said, "Video games. I love video games. But I don't have time to learn how to make them, I've got a job, a family, and a kid."Then he hit me with something that really shifted my whole perspective."Oleh, do you play games on your PlayStation?"I said, "Of course."He replied, "Then why not take the time you spend playing and use it to learn how to make games?"That moment flipped a switch in my mind. I realized that I did have time, it was just a matter of how I used it. If I really wanted to learn, I could find a way. At the time, I didn't even own a computer. But where there's a will, there's a way: I borrowed my sister's laptop for a month and started following beginner 3D tutorials on YouTube. Every night after work, once my family went to sleep, I'd sit in the kitchen and study. I stayed up until 2 or 3 AM, learning Blender basics. Then I'd sleep for a few hours before waking up at 6 AM to go back to work. That's how I spent my first few months in 3D, studying every single night.3D completely took over my life. During lunch breaks, I watched 3D videos, on the bus, I scrolled through 3D TikToks, at home, I took 3D courses, and the word "3D" just became a constant in my vocabulary.After a few months of learning the basics, I started building my portfolio, which looks pretty funny to me now. But at the time, it was a real sign of how committed I was. Eventually, someone reached out to me through Behance, offering my first freelance opportunity. And thatэs how my journey began, from mall clerk to 3D artist. It's been a tough road, full of burnout, doubts, and late nights... but also full of curiosity, growth, and hope. And I wouldn't trade it for anything.The Stitch ProjectI've loved Stitch since I was a kid. I used to watch the cartoons, play the video games, and he always felt like such a warm, funny, chill, and at the same time, strong character. So once I reached a certain level in 3D, I decided to recreate Stitch.Back then, my skills only allowed me to make him in a stylized cartoonish style, no fur, no complex detailing, no advanced texturing, I just didn't have the experience. Surprisingly, the result turned out pretty decent. Even now, I sometimes get comments that my old Stitch still looks quite cute. Though honestly, I wouldn't say that myself anymore. Two years have passed since I made that first Stitch, it was back in 2023. And in 2025, I decided it was time to challenge myself.At that point, I had just completed an intense grooming course. Grooming always intimidated me, it felt really complex. I avoided it on commercial projects, made a few failed attempts for my portfolio, and overall tried to steer clear of any tasks where grooming was required. But eventually, I found the strength to face it.I pushed myself to learn how to make great fur, and I did. I finally understood how the grooming system works, grasped the logic, the tools, and the workflow. And after finishing the course, I wanted to lock in all that knowledge by creating a full personal project from scratch.So my goal was to make a character from the ground up, where the final stage would be grooming. And without thinking too long, I chose Stitch.First, because I truly love the character. Second, I wanted to clearly see my own progress over the past two years. Third, I needed to put my new skills to the test and find out whether my training had really paid off.ModelingI had a few ideas for how to approach the base mesh for this project. First, to model everything completely from scratch, starting with a sphere. Second, to reuse my old Stitch model and upgrade it.But then an idea struck me: why not test how well AI could handle a base mesh? I gathered some references and tried generating a base mesh using AI, uploading Stitch visuals as a guide. As you can see from the screenshot, the result was far from usable. So I basically ended up doing everything from scratch anyway.So, I went back to basics: digging through ArtStation and Pinterest, collecting references. Since over the last two years, I had not only learned grooming but also completely changed my overall approach to character creation, it was important for me to make a more detailed model, even if much of it would be hidden under fur.The first Stitch was sculpted in Blender, with all the limitations that come with sculpting in it. But since then, I've leveled up significantly and switched to more advanced tools. So this second version of Stitch was born in ZBrush. By the time I started working on this Stitch, ZBrush had already become my second main workspace. I've used it to deliver tons of commercial projects, I work in it almost daily, and most of my portfolio was created using this tool. I found some great reference images showing Stitch's body structure. Among them were official movie references and a stunning high-poly model created by Juan Hernández, a version of Stitch without fur. That model became my primary reference for sculpting.Truth is, Stitch's base form is quite simple, so blocking out the shape didn't take too long. When blocking, I use Blender in combination with ZBrush:I work with primary forms in ZBrushThen check proportions in BlenderFix mistakes, tweak volumes, and refine the silhouetteSince Stitch's shape isn't overly complex, I broke him down into three main sculpting parts:The body: arms, legs, head, and earsThe nose, eyes, and mouth cavityWhile planning the sculpt, I already knew I'd be rigging Stitch, both body and facial rig. So I started sculpting with his mouth open (to later close it and have more flexibility when it comes to rigging and deformation).While studying various references, I noticed something interesting. Stitch from promotional posters, Stitch from the movie, and Stitch as recreated by different artists on ArtStation all look very different from one another. What surprised me the most was how different the promo version of Stitch is compared to the one in the actual movie. They are essentially two separate models:Different proportionsDifferent shapesDifferent texturesEven different fur and overall designThis presented a creative challenge, I had to develop my own take on Stitch's design. Sometimes I liked the way the teeth were done in one version, in another, the eye placement, in another, the fur shape, or the claw design on hands and feet.At first, considering that Stitch is completely covered in fur from head to toe, sculpting his underlying anatomy seemed pointless. I kept asking myself: "Why sculpt muscles and skin detail if everything will be hidden under fur anyway?"But eventually, I found a few solid answers for myself. First, having a defined muscle structure actually makes the fur grooming process easier. That's because fur often follows the flow of muscle lines, so having those muscles helps guide fur direction more accurately across the character's body.Second, it's great anatomy practice, and practice is never a waste. So, I found a solid anatomical reference of Stitch with clearly visible muscle groups and tried to recreate that structure as closely as possible in my own sculpt.In the end, I had to develop a full visual concept by combining elements from multiple versions of Stitch. Through careful reference work and constantly switching between Blender and ZBrush, I gradually, but intentionally, built up the body and overall look of our favorite fluffy alien.Topology & UVsThroughout the sculpting process, I spent quite a bit of time thinking about topology. I was looking for the most balanced solution between quality and production time. Normally, I do manual retopology for my characters, but this time, I knew it would take too much time, and honestly, I didn't have that luxury.So I decided to generate the topology using ZBrush's tools. I split the model into separate parts using Polygroups, assigning individual groups for the ears, the head, the torso, the arms, the legs, and each of Stitch's fingers.With the Polygroups in place, I used ZRemesher with Keep Groups enabled and smoothing on group borders. This gave me a clean and optimized mesh that was perfect for UV unwrapping.Of course, this kind of auto-retopology isn't a full substitute for manual work, but it saved me a huge amount of time, and the quality was still high enough for what I needed. However, there was one tricky issue. Although Stitch looks symmetrical at first glance, his ears are actually asymmetrical. The right ear has a scar on the top, while the left has a scar on the bottomBecause of that, I couldn't just mirror one side in ZBrush without losing those unique features. Here's what I ended up doing: I created a symmetrical model with the right ear, then another symmetrical model with the left ear. I brought both into Blender, detached the left ear from one model, and attached it to the body of the other one. This way, I got a clean, symmetrical base mesh with asymmetrical ears, preserving both topology and detail. And thanks to the clean polygroup-based layout, I was able to unwrap the UVs with nice, even seams and clean islands.When it came to UV mapping, I divided Stitch into two UDIM tiles:The first UDIM includes the head with ears, torso, arms, and legs.The second UDIM contains all the additional parts: teeth, tongue, gums, claws, and nose (For the claws, I used overlapping UVs to preserve texel density for the other parts)Since the nose is one of the most important details, I allocated the largest space to it, which helped me to better capture its intricate details.As for the eyes, I used procedural eyes, so there was no need to assign UV space or create a separate UDIM for texturing them. To achieve this, I used the Tiny Eye add-on by tinynocky for Blender, which allows full control over procedural eyes and their parameters.This approach gave me high-quality eyes with customizable elements tailored exactly to my needs. As a result of all these steps, Stitch ended up with a symmetrical, optimized mesh, asymmetrical ears, and the body split across two UDIMs, one for the main body and one for the additional parts.TexturingWhen planning Stitch's texturing, I understood that the main body texture would be fairly simple, with much of the visual detail enhanced by the fur. However, there were some areas that required much more attention than the rest of the body. The textures for Stitch can be roughly divided into several main parts:The base body, which includes the primary color of his fur, along with additional shading like a lighter tone on the front (belly) and a darker tone on the back and napeThe nose and ears, these zones, demanded separate focusAt the initial texturing/blocking stage, the ears looked too cartoony, which didn’t fit the style I wanted. So, I decided to push them towards a more realistic look. This involved removing bright colors, adding more variation in the roughness map, introducing variation in the base color, and making the ears visually more natural, layered, and textured on the surface. By combining smart materials and masks, I achieved the effect of "living" ears, slightly dirty and looking as natural as possible.The nose was a separate story. It occupies a significant part of the face and thus draws a lot of attention. While studying references, I noticed that the shape and texture of the nose vary a lot between different artists. Initially, I made it dog-like, with some wear and tear around the nostrils and base.For a long time, I thought this version was acceptable. But during test renders, I realized the nose needed improvement. So I reworked its texturing, aiming to make it more detailed. I divided the nose texture into four main layers:Base detail: Baked from the high-poly model. Over this, I applied a smart skin material that added characteristic bumps.Lighter layer: Applied via a mask using the AO channel. This darkened the crevices and brightened the bumps, creating a multi-layered effect.Organic detail (capillaries): In animal references, I noticed slight redness in the nose area. I created another AO-masked layer with reddish capillaries visible through the bumps, adding depth and realism.Softness: To make the nose visually softer, like in references, I added a fill layer with only height enabled, used a paper texture as grayscale, and applied a blurred mask. This created subtle dents and wrinkles that softened the look.All textures were created in 4K resolution to achieve maximum detail. After finishing the main texturing stage, I add an Ambient Occlusion map on the final texture layer, activating only the Color channel, setting the blend mode to Multiply, and reducing opacity to about 35%. This adds volume and greatly improves the overall perception of the model.That covers the texturing of Stitch’s body. I also created a separate texture for the fur. This was simpler, I disabled unnecessary layers like ears and eyelids, and left only the base ones corresponding to the body’s color tones.During grooming (which I'll cover in detail later), I also created textures for the fur's clamps and roughness. In Substance 3D Painter, I additionally painted masks for better fur detail.FurAnd finally, I moved on to the part that was most important to me, the very reason I started this project in the first place. Fur. This entire process was essentially a test of my fur grooming skills. After overcoming self-doubt, I trusted the process and relied on everything I had learned so far. Before diving into the grooming itself, I made sure to gather strong references. I searched for the highest quality and most inspiring examples I could find and analyzed them thoroughly. My goal was to clearly understand the direction of fur growth, its density and volume, the intensity of roughness, and the strength of clumping in different areas of Stitch's body.To create the fur, I used Blender and its Hair Particle System. The overall approach is similar to sculpting a high-detail model: work from broad strokes to finer details. So, the first step was blocking out the main flow and placement of the hair strands.At this point, I ran into a challenge: symmetry. Since the model was purposefully asymmetrical (because of the ears and skin folds), the fur couldn't be mirrored cleanly. To solve this, I created a base fur blocking using Hair Guides with just two segments. After that, I split the fur into separate parts. I duplicated the main Particle System and created individual hair systems for each area where needed.In total, I broke Stitch's body into key sections: head, left ear, right ear, front torso, back torso, arms, hands, upper and lower legs, toes, and additional detailing layers. The final fur setup included 25 separate particle systems.To control fur growth, I used Weight Paint to fine-tune the influence on each body part individually. This separation gave me much more precision and allowed full control over every parameter of the fur on a per-section basis.The most challenging aspect of working with fur is staying patient and focused. Detail is absolutely critical because the overall picture is built entirely from tiny, subtle elements. Once the base layer was complete, I moved on to refining the fur based on my references.The most complex areas turned out to be the front of the torso and the face. When working on the torso, my goal was to create a smooth gradient, from thick, clumped fur on the chest to shorter, softer fur on the stomach.Step by step, I adjusted the transitions, directions, clumps, and volumes to achieve that look. Additionally, I used the fur itself to subtly enhance Stitch's silhouette, making his overall shape feel sharper, more expressive, and visually engaging.During fur development, I used texture maps to control the intensity of the Roughness and Clump parameters. This gave me a high degree of flexibility, textures drove these attributes across the entire model. In areas where stronger clumping or roughness was needed, I used brighter values; in zones requiring a softer look, darker values. This approach allowed for fine-tuned micro-level control of the fur shader and helped achieve a highly realistic appearance in renders.The face required special attention: the fur had to be neat, evenly distributed, and still visually appealing. The biggest challenge here was working around the eye area. Even with properly adjusted Weight Paint, interpolation sometimes caused strands to creep into the eyes.I spent a lot of time cleaning up this region to get an optimal result. I also had to revisit certain patches that looked bald, even though interpolation and weight painting were set correctly, because the fur didn't render properly there. These areas needed manual fixing.As part of the detailing stage, I also increased the number of segments in the Hair Guides.While the blocking phase only used two segments, I went up to three, and in some cases even five, for more complex regions. This gave me much more control over fur shape and flow.The tiniest details really matter, so I added extra fur layers with thinner, more chaotic strands extending slightly beyond the main silhouette. These micro-layers significantly improved the texture depth and boosted the overall realism.Aside from the grooming itself, I paid special attention to the fur material setup, as the shader plays a critical role in the final visual quality of the render. It's not enough to simply plug a color texture into a Principled BSDF node and call it done.I built a more complex shader, giving me precise control over various attributes. For example, I implemented subtle color variation across individual strands, along with darkening near the roots and a gradual brightening toward the tips. This helped add visual depth and made the fur look significantly more natural and lifelike.Working on the fur took up nearly half of the total time I spent on the entire model. And I'm genuinely happy with the result, this stage confirmed that the training I've gone through was solid and that I’m heading in the right direction with my artistic development.Rigging, Posing & SceneOnce I finished working on the fur, I rendered several 4K test shots from different angles to make sure every detail looked the way I intended. When I was fully satisfied with the results, it was time to move on to rigging.I divided the rigging process into three main parts:Body rig, for posing and positioning the characterFacial rig, for expressions and emotionsEar rig, for dynamic ear controlRigging isn't something I consider my strongest skill, but as a 3D generalist, I had to dive into many technical aspects of it. For the ears, I set up a relatively simple system with several bones connected using inverse kinematics (IK). This gave me flexible and intuitive control during posing and allowed for the addition of dynamic movement in animation.For facial rigging, I used the FaceIt add-on, which generates a complete facial control system for mouth, eyes, and tongue. It sped up the process significantly and gave me more precision. For the body, I used the ActorCore Rig by NVIDIA, then converted it to Rigify, which gave me a familiar interface and flexible control over poses.Posing is one of my favorite stages, it's when the character really comes to life. As usual, it started with gathering references. Honestly, it was hard to pick the final poses, Stitch is so expressive and full of personality that I wanted to try hundreds of them. But I focused on those that best conveyed the spirit and mood of the character. Some poses I reworked to fit my style rather than copying directly. For example, in the pose where Stitch licks his nose, I added drool and a bit of "green slime" for comedic effect. To capture motion, I tilted his head back and made the ears fly upward, creating a vivid, emotional snapshot.Just like in sculpting or grooming, minor details make a big difference in posing. Examples include: a slight asymmetry in the facial expression, a raised corner of the mouth, one eye squinting a little more than the other, and ears set at slightly different angles.These are subtle things that might not be noticed immediately, but they’re the key to making the character feel alive and believable.For each pose, I created a separate scene and collection in Blender, including the character, specific lighting setup, and a simple background or environment. This made it easy to return to any scene later, to adjust lighting, reposition the character, or tweak the background.In one of the renders, which I used as the cover image, Stitch is holding a little frog.I want to clearly note that the 3D model of the frog is not mine, full credit goes to the original author of the asset.At first, I wanted to build a full environment around Stitch, to create a scene that would feel like a frame from a film. But after carefully evaluating my skills and priorities, I decided that a weak environment would only detract from the strength of the character. So I opted for a simple, neutral backdrop, designed to keep all the focus on Stitch himself.Rendering, Lighting & Post-ProcessingWhen the character is complete, posed expressively, and integrated into the scene, there's one final step: lighting. Lighting isn't just a technical element of the scene — it’s a full-fledged stage of the 3D pipeline. It doesn't just illuminate; it paints. Proper lighting can highlight the personality of the character, emphasize forms, and create atmosphere.For all my renders, I rely on the classic three-point lighting setup: Key Light, Fill Light, and Rim Light.While this setup is well-known, it remains highly effective. When done thoughtfully, with the right intensity, direction, and color temperature, it creates a strong light-shadow composition that brings the model to life. In addition to the three main lights, I also use an HDRI map, but with very low intensity, around 0.3, just enough to subtly enrich the ambient light without overpowering the scene.Once everything is set, it's time to hit Render and wait for the result. Due to hardware limitations, I wasn’t able to produce full animated shots with fur. Rendering a single 4K image with fur took over an hour, so I limited myself to a 360° turnaround and several static renders.I don't spend too much time on post-processing, just basic refinements in Photoshop. Slight enhancement of the composition, gentle shadow adjustments, color balance tweaks, and adding a logo. Everything is done subtly, nothing overprocessed. The goal is simply to support and enhance what’s already there.Final ThoughtsThis project has been an incredible experience. Although it was my second time creating Stitch (the first was back in 2023), this time the process felt completely different at every stage. And honestly, it wasn't easy.But that was exactly the point: to challenge myself. To reimagine something familiar, to try things I'd never done before, and to walk the full journey from start to finish. The fur, the heart of this project, was especially meaningful to me. It’s what started it all. I poured a lot into this model: time, effort, emotion, and even doubts. But at the same time, I brought all my knowledge, skills, and experience into it.This work became a mirror of my progress from 2023 to 2025. I can clearly see how far I've come, and that gives me the motivation to keep going. Every hour of learning and practice paid off, the results speak for themselves. This model was created for my portfolio. I don't plan to use it commercially, unless, of course, a studio actually wants to license it for a new film (in that case, I'd be more than happy!)It's been a long road: challenging, sometimes exhausting, but above all inspiring and exciting. I know there's still a lot to learn. Many things to study, improve, and polish to perfection. But I'm already on that path, and I'm not stopping.Oleh Yakushev, 3D Character ArtistInterview conducted by Gloria Levine
    Like
    Love
    Wow
    Sad
    Angry
    574
    · 2 Commentaires ·0 Parts
  • يا جماعة، كاش منكم يحب Apple؟

    البارح قرأت مقال يحمس على iPhone 17، واللي يقولوا عليه "أرفع iPhone في التاريخ". وبصراحة كاين شغف كبير حول هاد الحدث، حكاية جديدة من Apple مع موديل جديد رقيق، وحتى AirPods الجديدة! يتوقعوا تغييرات كبيرة وأفكار مبدعة، كيما عودونا.

    شخصياً، أنا متحمس شوية لتجربة الهواتف الرفيعة، لكن في نفس الوقت نتساءل، هل فعلاً هذا هو الشيء اللي نحتاجوه؟ ولا من الأفضل نبقاو على التقنية القوية والشكل الأصيل؟ المهم، كل واحد وذوقه.

    يلا نشوفوا شنو كاين في هاد الحدث ونتفكروا شوية في كيفاش التكنولوجيا رح تؤثر على حياتنا.

    https://techcrunch.com/2025/08/24/iphone-17-the-thinnest-iphone-ever-and-everything-else-were-expecting-out-of-apples-hardware-event/

    #iPhone17 #AppleEvent #تقنية #تكنولوجيا #
    يا جماعة، كاش منكم يحب Apple؟ 🍏 البارح قرأت مقال يحمس على iPhone 17، واللي يقولوا عليه "أرفع iPhone في التاريخ". وبصراحة كاين شغف كبير حول هاد الحدث، حكاية جديدة من Apple مع موديل جديد رقيق، وحتى AirPods الجديدة! يتوقعوا تغييرات كبيرة وأفكار مبدعة، كيما عودونا. شخصياً، أنا متحمس شوية لتجربة الهواتف الرفيعة، لكن في نفس الوقت نتساءل، هل فعلاً هذا هو الشيء اللي نحتاجوه؟ ولا من الأفضل نبقاو على التقنية القوية والشكل الأصيل؟ المهم، كل واحد وذوقه. يلا نشوفوا شنو كاين في هاد الحدث ونتفكروا شوية في كيفاش التكنولوجيا رح تؤثر على حياتنا. https://techcrunch.com/2025/08/24/iphone-17-the-thinnest-iphone-ever-and-everything-else-were-expecting-out-of-apples-hardware-event/ #iPhone17 #AppleEvent #تقنية #تكنولوجيا #
    techcrunch.com
    From a new slim iPhone Air model to redesigned AirPods, here's what to expect from this year's Apple event.
    Like
    Love
    Wow
    Sad
    Angry
    712
    · 1 Commentaires ·0 Parts
  • Lost Soul Aside: PC features and a behind-the-scenes look

    Hello everyone! Before unveiling what we’ve prepared for PC players when Lost Soul Aside hits PC and PS5 on August 29, I want to share the journey that brought us here.

    Play Video

    Behind the scenes – Meet the team and the journey behind the game

    What began as a solo prototype has grown through years of iteration, the incredible support of the China Hero Project, and the encouragement of a passionate community into the full-scale action RPG you see today. In our new Behind-the-Scenes developer video, you’ll meet the talented team at Ultizero Games and hear, in our own words, about the passion, challenges, and breakthroughs that shaped every strike, combo, and boss encounter. It’s an inside look at the creative process that brought Lost Soul Aside from a single idea to the game we can’t wait for you to play.

    Play Video

    From our story to your screen – the PC experience

    As we approach launch, I’m excited to share that Lost Soul Aside is now in its final polishing stage for PC—releasing worldwide alongside the PlayStation 5 version. We’ve worked hard to ensure that PC players enjoy a true next-generation experience, and we’ve prepared four special features unique to the platform. These enhancements take full advantage of PC hardware so you can experience the game at its best, and I’m thrilled to finally reveal them to you.

    Full DualSense controller support

    Connect your DualSense controller via USB-C or Bluetoothand enjoy native support—no extra drivers needed.

    Adaptive Triggers: Each weapon and mechanism delivers unique resistance curves for a tactile, responsive feel.

    Haptic Feedback: From the clash of steel to explosive impacts and the rush of running through water, every vibration is precision-tuned to match the on-screen action.Just plug in and play.

    4K + HDR visuals 

    Experience Lost Soul Aside in native 4Kresolution with multi-monitor support for maximum immersion.

    High Dynamic Rangebrings out deep shadow details and vibrant neon highlights, delivering stunning contrast—“one glance, and your soul is hooked.”

    Ray Tracing 

    Ray-Traced Reflections: Crystal-clear water surfaces, polished armor, and metallic weapons reflect their surroundings in real time.

    Ray-Traced Global Illumination: Sunlight breaking through clouds and neon glow diffusing through the air add incredible depth to every scene.

    Ray-Traced Shadows: High-resolution, soft shadows shift naturally with light, enhancing realism in both exploration and combat.All ray-tracing effects are optimized with DLSS 4, FSR, and Frame Generation, ensuring smooth 4K 60 FPS gameplay—even on more modest hardware.


    PlayStation account linking — Cross-Platform Trophy Sync

    When you first launch the game, you’ll have the option to link your PlayStation Network account. Once connected, all achievements earned on PC will sync instantly with your PlayStation Network profile—and vice versa. It’s truly “unlock once, show off everywhere”—your Platinum Trophy journey continues seamlessly across platforms.

    Wondering if your PC can handle Lost Soul Aside? Here are the system requirements:

    PC Specs for Lost Soul AsideMinimumRecommendedHighHighUltraGPUNVIDIA GTX 1060 / AMD RX 5500 XTNVIDIA RTX 2060 / AMD RX 5700 XTNVIDIA RTX 3070 / AMD RX 6800 XTNVIDIA RTX 4080s / AMD RX 7900 XTNVIDIA RTX 5070 TiCPUIntel i5-10400 / AMD Ryzen 5 3600Intel i5-10400 / AMD Ryzen 5 3600Intel i7-11700 / AMD Ryzen 7 5700XIntel i7-11700 / AMD Ryzen 7 5700XIntel i7-13700K / AMD Ryzen 7 7800XRAM16 GB16 GB16 GB16 GB16 GBOSWin 10/11 64-bitWin 10/11 64-bitWin 10/11 64-bitWin 10/11 64-bitWin 10/11 64-bitStorage80 GB SSD80 GB SSD80 GB SSD80 GB SSD80 GB SSD

    The PC version of Lost Soul Aside launches August 28 at 5pm PDT / August 29 at 8am CSTand is now available for pre-purchase on Steam and the Epic Games Store. Lock in your platform and brace for the ultimate fusion of razor-sharp action and next-gen audiovisuals!

    Lost Soul Aside PlayStation 5 Pro enhancements

    I know many of you are excited to experience Lost Soul Aside on PlayStation 5 Pro, so I’m happy to share what we’ve done to make the most of its powerful hardware. 

    On PS5 Pro, you’ll be able to play in dynamic 4K with enhanced ray-traced reflections, shadows, and global illumination, bringing every scene to life with incredible depth and realism. We’ve also taken advantage of the Pro’s boosted GPU to push higher texture quality, more detailed particle effects, and even faster loading through the ultra-fast SSD. Additionally, players will benefit from a higher and more stable frame rate, ensuring fluid, responsive gameplay even in the most intense battles. The result is smoother combat, sharper visuals, and an even more immersive adventure from start to finish.

    I want to thank all of you for your patience and support throughout this journey. It’s been many years in the making, and every step has been driven by your passion for Lost Soul Aside. Whether you choose to play on PC, PlayStation 5, or PlayStation 5 Pro, my hope is that you’ll feel the heart, detail, and care we’ve poured into every moment. The launch is just the beginning, and I can’t wait to see your reactions, your gameplay clips, and your stories from this world we’ve built together. See you at launch!
    #lost #soul #aside #features #behindthescenes
    Lost Soul Aside: PC features and a behind-the-scenes look
    Hello everyone! Before unveiling what we’ve prepared for PC players when Lost Soul Aside hits PC and PS5 on August 29, I want to share the journey that brought us here. Play Video Behind the scenes – Meet the team and the journey behind the game What began as a solo prototype has grown through years of iteration, the incredible support of the China Hero Project, and the encouragement of a passionate community into the full-scale action RPG you see today. In our new Behind-the-Scenes developer video, you’ll meet the talented team at Ultizero Games and hear, in our own words, about the passion, challenges, and breakthroughs that shaped every strike, combo, and boss encounter. It’s an inside look at the creative process that brought Lost Soul Aside from a single idea to the game we can’t wait for you to play. Play Video From our story to your screen – the PC experience As we approach launch, I’m excited to share that Lost Soul Aside is now in its final polishing stage for PC—releasing worldwide alongside the PlayStation 5 version. We’ve worked hard to ensure that PC players enjoy a true next-generation experience, and we’ve prepared four special features unique to the platform. These enhancements take full advantage of PC hardware so you can experience the game at its best, and I’m thrilled to finally reveal them to you. Full DualSense controller support Connect your DualSense controller via USB-C or Bluetoothand enjoy native support—no extra drivers needed. Adaptive Triggers: Each weapon and mechanism delivers unique resistance curves for a tactile, responsive feel. Haptic Feedback: From the clash of steel to explosive impacts and the rush of running through water, every vibration is precision-tuned to match the on-screen action.Just plug in and play. 4K + HDR visuals  Experience Lost Soul Aside in native 4Kresolution with multi-monitor support for maximum immersion. High Dynamic Rangebrings out deep shadow details and vibrant neon highlights, delivering stunning contrast—“one glance, and your soul is hooked.” Ray Tracing  Ray-Traced Reflections: Crystal-clear water surfaces, polished armor, and metallic weapons reflect their surroundings in real time. Ray-Traced Global Illumination: Sunlight breaking through clouds and neon glow diffusing through the air add incredible depth to every scene. Ray-Traced Shadows: High-resolution, soft shadows shift naturally with light, enhancing realism in both exploration and combat.All ray-tracing effects are optimized with DLSS 4, FSR, and Frame Generation, ensuring smooth 4K 60 FPS gameplay—even on more modest hardware.   PlayStation account linking — Cross-Platform Trophy Sync When you first launch the game, you’ll have the option to link your PlayStation Network account. Once connected, all achievements earned on PC will sync instantly with your PlayStation Network profile—and vice versa. It’s truly “unlock once, show off everywhere”—your Platinum Trophy journey continues seamlessly across platforms. Wondering if your PC can handle Lost Soul Aside? Here are the system requirements: PC Specs for Lost Soul AsideMinimumRecommendedHighHighUltraGPUNVIDIA GTX 1060 / AMD RX 5500 XTNVIDIA RTX 2060 / AMD RX 5700 XTNVIDIA RTX 3070 / AMD RX 6800 XTNVIDIA RTX 4080s / AMD RX 7900 XTNVIDIA RTX 5070 TiCPUIntel i5-10400 / AMD Ryzen 5 3600Intel i5-10400 / AMD Ryzen 5 3600Intel i7-11700 / AMD Ryzen 7 5700XIntel i7-11700 / AMD Ryzen 7 5700XIntel i7-13700K / AMD Ryzen 7 7800XRAM16 GB16 GB16 GB16 GB16 GBOSWin 10/11 64-bitWin 10/11 64-bitWin 10/11 64-bitWin 10/11 64-bitWin 10/11 64-bitStorage80 GB SSD80 GB SSD80 GB SSD80 GB SSD80 GB SSD The PC version of Lost Soul Aside launches August 28 at 5pm PDT / August 29 at 8am CSTand is now available for pre-purchase on Steam and the Epic Games Store. Lock in your platform and brace for the ultimate fusion of razor-sharp action and next-gen audiovisuals! Lost Soul Aside PlayStation 5 Pro enhancements I know many of you are excited to experience Lost Soul Aside on PlayStation 5 Pro, so I’m happy to share what we’ve done to make the most of its powerful hardware.  On PS5 Pro, you’ll be able to play in dynamic 4K with enhanced ray-traced reflections, shadows, and global illumination, bringing every scene to life with incredible depth and realism. We’ve also taken advantage of the Pro’s boosted GPU to push higher texture quality, more detailed particle effects, and even faster loading through the ultra-fast SSD. Additionally, players will benefit from a higher and more stable frame rate, ensuring fluid, responsive gameplay even in the most intense battles. The result is smoother combat, sharper visuals, and an even more immersive adventure from start to finish. I want to thank all of you for your patience and support throughout this journey. It’s been many years in the making, and every step has been driven by your passion for Lost Soul Aside. Whether you choose to play on PC, PlayStation 5, or PlayStation 5 Pro, my hope is that you’ll feel the heart, detail, and care we’ve poured into every moment. The launch is just the beginning, and I can’t wait to see your reactions, your gameplay clips, and your stories from this world we’ve built together. See you at launch! #lost #soul #aside #features #behindthescenes
    Lost Soul Aside: PC features and a behind-the-scenes look
    blog.playstation.com
    Hello everyone! Before unveiling what we’ve prepared for PC players when Lost Soul Aside hits PC and PS5 on August 29, I want to share the journey that brought us here. Play Video Behind the scenes – Meet the team and the journey behind the game What began as a solo prototype has grown through years of iteration, the incredible support of the China Hero Project, and the encouragement of a passionate community into the full-scale action RPG you see today. In our new Behind-the-Scenes developer video, you’ll meet the talented team at Ultizero Games and hear, in our own words, about the passion, challenges, and breakthroughs that shaped every strike, combo, and boss encounter. It’s an inside look at the creative process that brought Lost Soul Aside from a single idea to the game we can’t wait for you to play. Play Video From our story to your screen – the PC experience As we approach launch, I’m excited to share that Lost Soul Aside is now in its final polishing stage for PC—releasing worldwide alongside the PlayStation 5 version. We’ve worked hard to ensure that PC players enjoy a true next-generation experience, and we’ve prepared four special features unique to the platform. These enhancements take full advantage of PC hardware so you can experience the game at its best, and I’m thrilled to finally reveal them to you. Full DualSense controller support Connect your DualSense controller via USB-C or Bluetooth (note: full functionality requires USB-C) and enjoy native support—no extra drivers needed. Adaptive Triggers: Each weapon and mechanism delivers unique resistance curves for a tactile, responsive feel. Haptic Feedback: From the clash of steel to explosive impacts and the rush of running through water, every vibration is precision-tuned to match the on-screen action.Just plug in and play. 4K + HDR visuals  Experience Lost Soul Aside in native 4K (3840×2160) resolution with multi-monitor support for maximum immersion. High Dynamic Range (HDR) brings out deep shadow details and vibrant neon highlights, delivering stunning contrast—“one glance, and your soul is hooked.” Ray Tracing  Ray-Traced Reflections: Crystal-clear water surfaces, polished armor, and metallic weapons reflect their surroundings in real time. Ray-Traced Global Illumination: Sunlight breaking through clouds and neon glow diffusing through the air add incredible depth to every scene. Ray-Traced Shadows: High-resolution, soft shadows shift naturally with light, enhancing realism in both exploration and combat.All ray-tracing effects are optimized with DLSS 4, FSR, and Frame Generation, ensuring smooth 4K 60 FPS gameplay—even on more modest hardware.   PlayStation account linking — Cross-Platform Trophy Sync When you first launch the game, you’ll have the option to link your PlayStation Network account. Once connected, all achievements earned on PC will sync instantly with your PlayStation Network profile—and vice versa. It’s truly “unlock once, show off everywhere”—your Platinum Trophy journey continues seamlessly across platforms. Wondering if your PC can handle Lost Soul Aside? Here are the system requirements: PC Specs for Lost Soul AsideMinimumRecommendedHighHigh (RT On)Ultra (RT On)GPUNVIDIA GTX 1060 / AMD RX 5500 XTNVIDIA RTX 2060 / AMD RX 5700 XTNVIDIA RTX 3070 / AMD RX 6800 XTNVIDIA RTX 4080s / AMD RX 7900 XTNVIDIA RTX 5070 TiCPUIntel i5-10400 / AMD Ryzen 5 3600Intel i5-10400 / AMD Ryzen 5 3600Intel i7-11700 / AMD Ryzen 7 5700XIntel i7-11700 / AMD Ryzen 7 5700XIntel i7-13700K / AMD Ryzen 7 7800XRAM16 GB16 GB16 GB16 GB16 GBOSWin 10/11 64-bitWin 10/11 64-bitWin 10/11 64-bitWin 10/11 64-bitWin 10/11 64-bitStorage80 GB SSD80 GB SSD80 GB SSD80 GB SSD80 GB SSD The PC version of Lost Soul Aside launches August 28 at 5pm PDT / August 29 at 8am CST (Beijing) and is now available for pre-purchase on Steam and the Epic Games Store. Lock in your platform and brace for the ultimate fusion of razor-sharp action and next-gen audiovisuals! Lost Soul Aside PlayStation 5 Pro enhancements I know many of you are excited to experience Lost Soul Aside on PlayStation 5 Pro, so I’m happy to share what we’ve done to make the most of its powerful hardware.  On PS5 Pro, you’ll be able to play in dynamic 4K with enhanced ray-traced reflections, shadows, and global illumination, bringing every scene to life with incredible depth and realism. We’ve also taken advantage of the Pro’s boosted GPU to push higher texture quality, more detailed particle effects, and even faster loading through the ultra-fast SSD. Additionally, players will benefit from a higher and more stable frame rate, ensuring fluid, responsive gameplay even in the most intense battles. The result is smoother combat, sharper visuals, and an even more immersive adventure from start to finish. I want to thank all of you for your patience and support throughout this journey. It’s been many years in the making, and every step has been driven by your passion for Lost Soul Aside. Whether you choose to play on PC, PlayStation 5, or PlayStation 5 Pro, my hope is that you’ll feel the heart, detail, and care we’ve poured into every moment. The launch is just the beginning, and I can’t wait to see your reactions, your gameplay clips, and your stories from this world we’ve built together. See you at launch!
    Like
    Love
    Wow
    Sad
    Angry
    1KB
    · 2 Commentaires ·0 Parts
Plus de résultats
ollo https://www.ollo.ws